
01
Nano Brows
Fine, individual hair strokes designed to restore the appearance of naturally fuller brows.
Enquire
Brows · Lips · Eyeliner · Scalp
Designed around
your features.
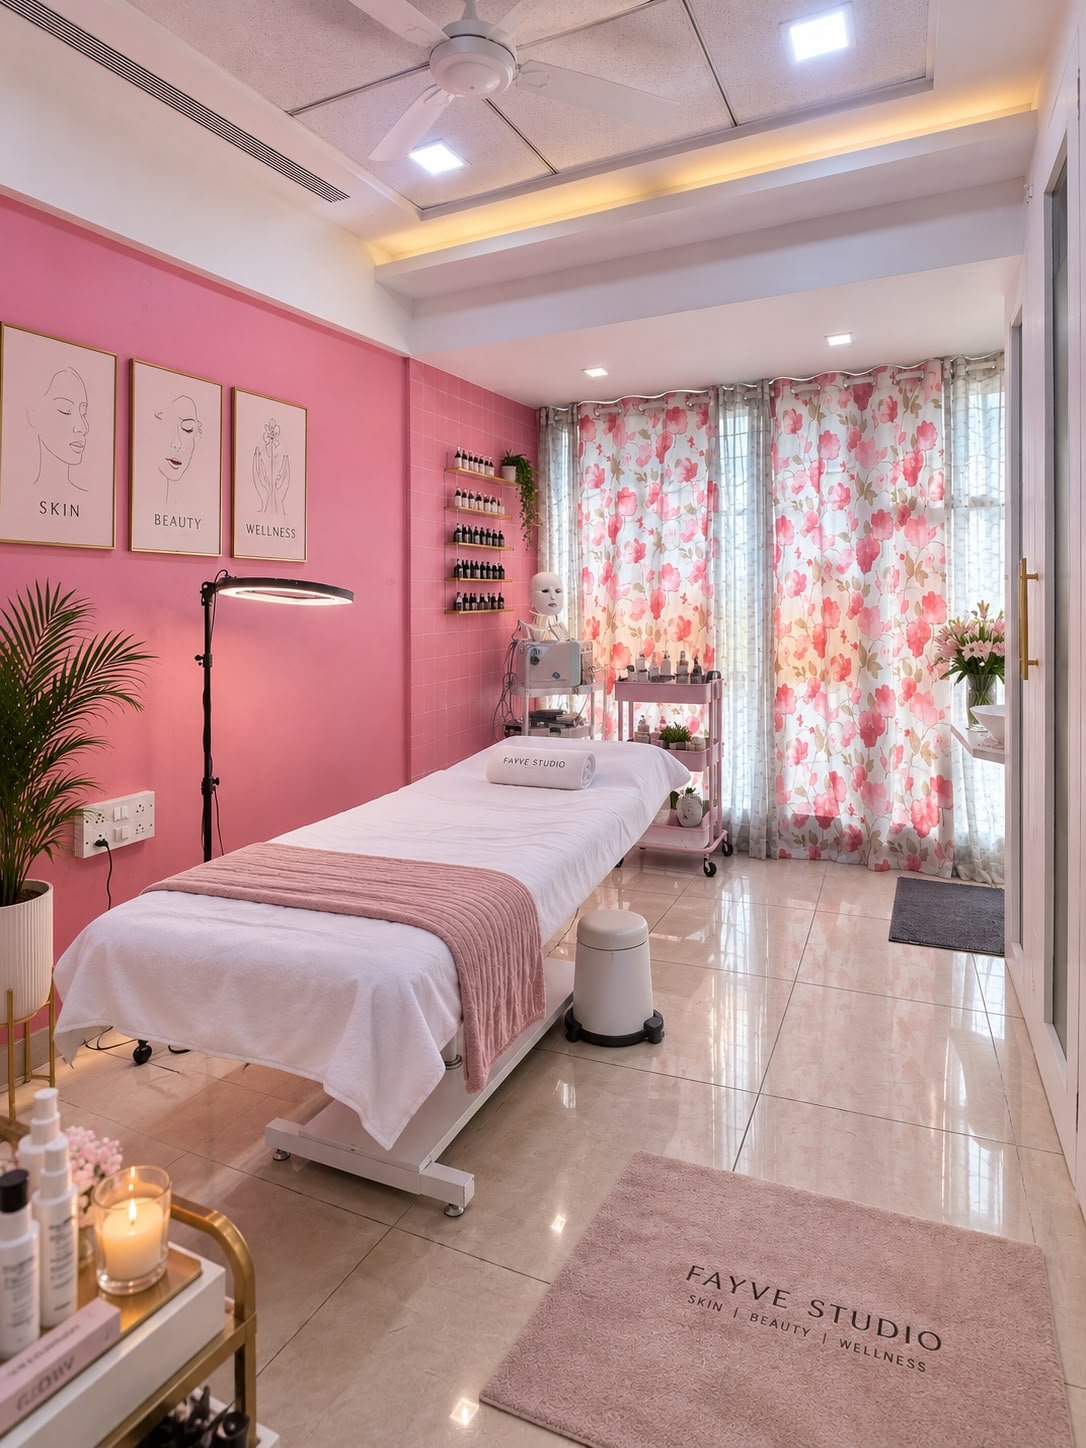
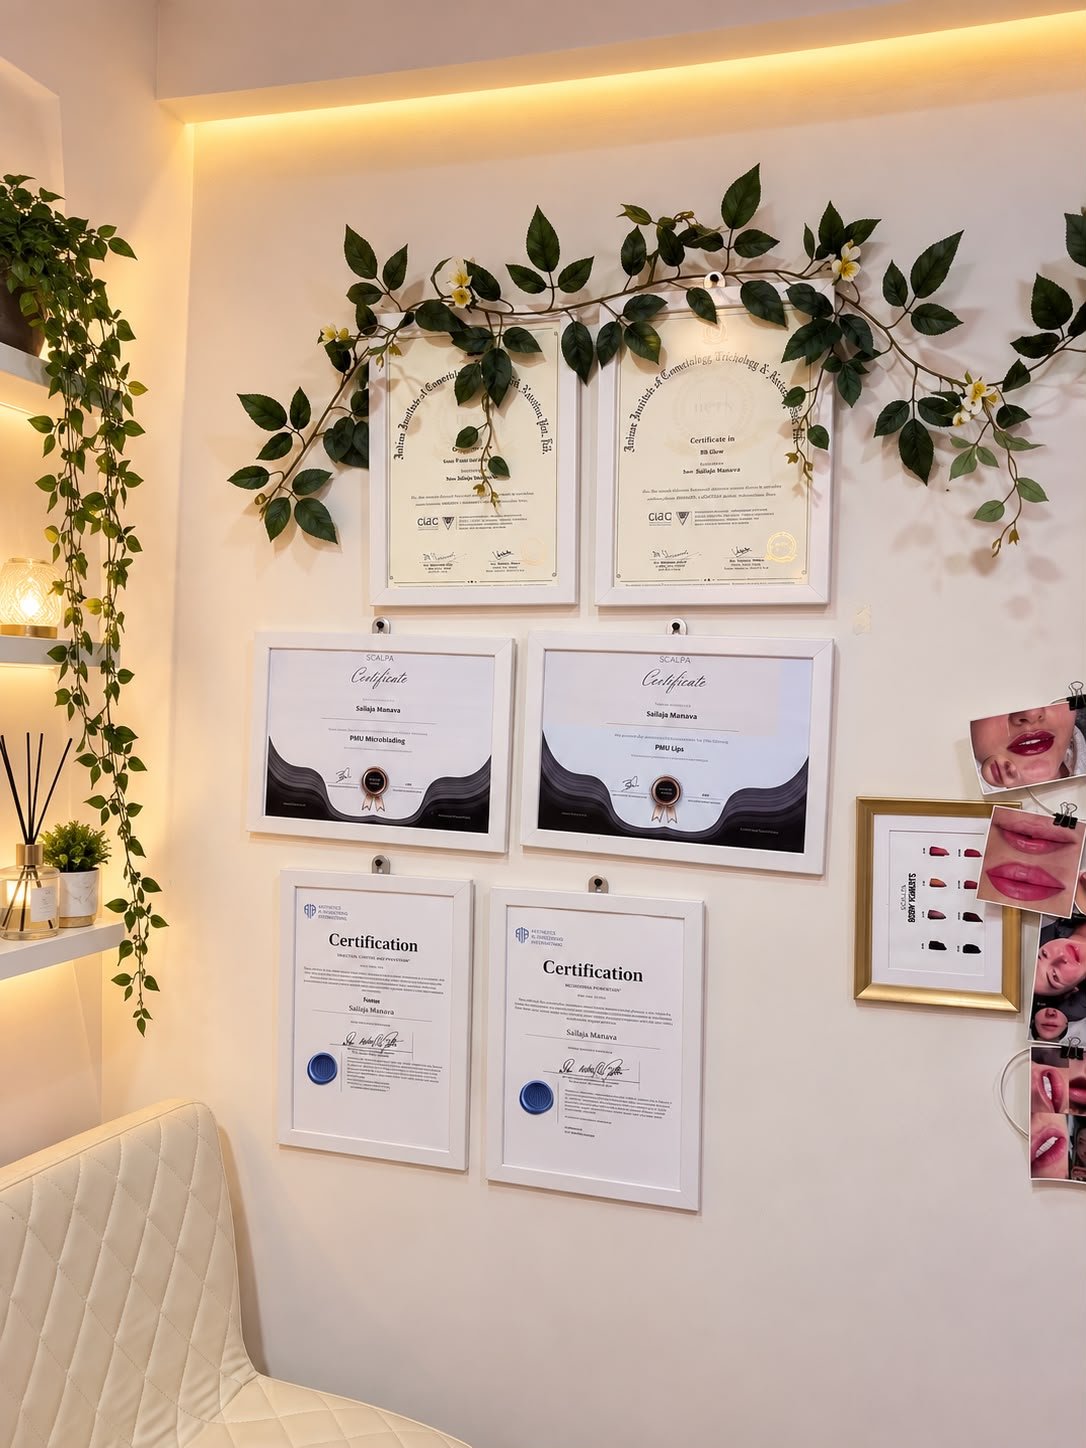
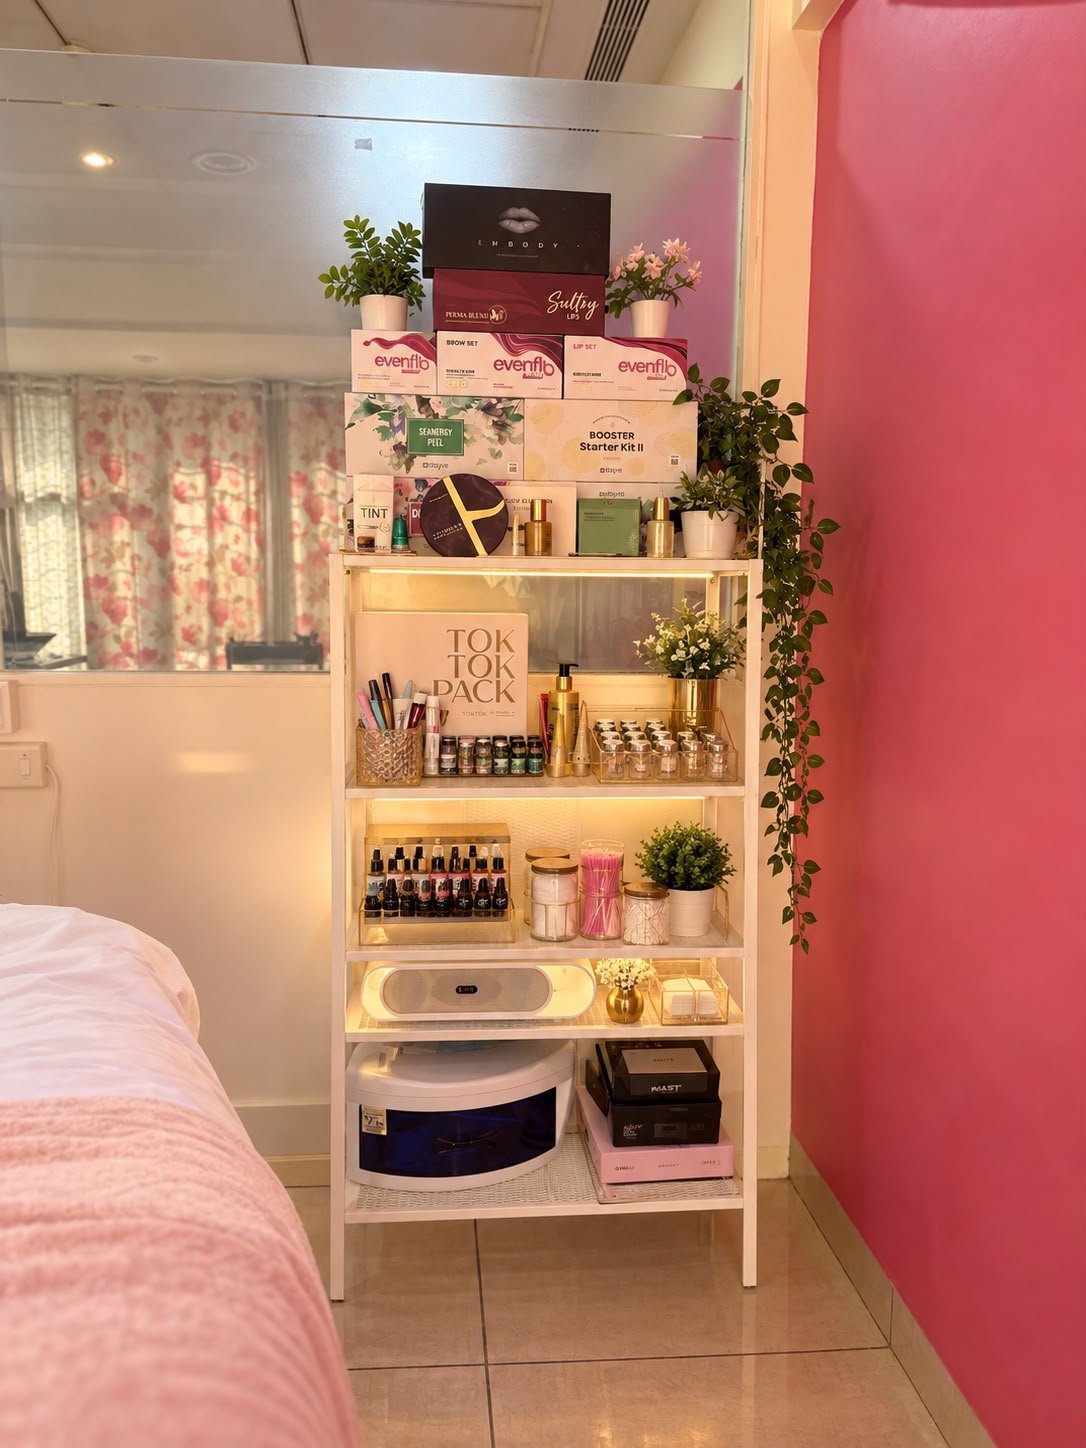
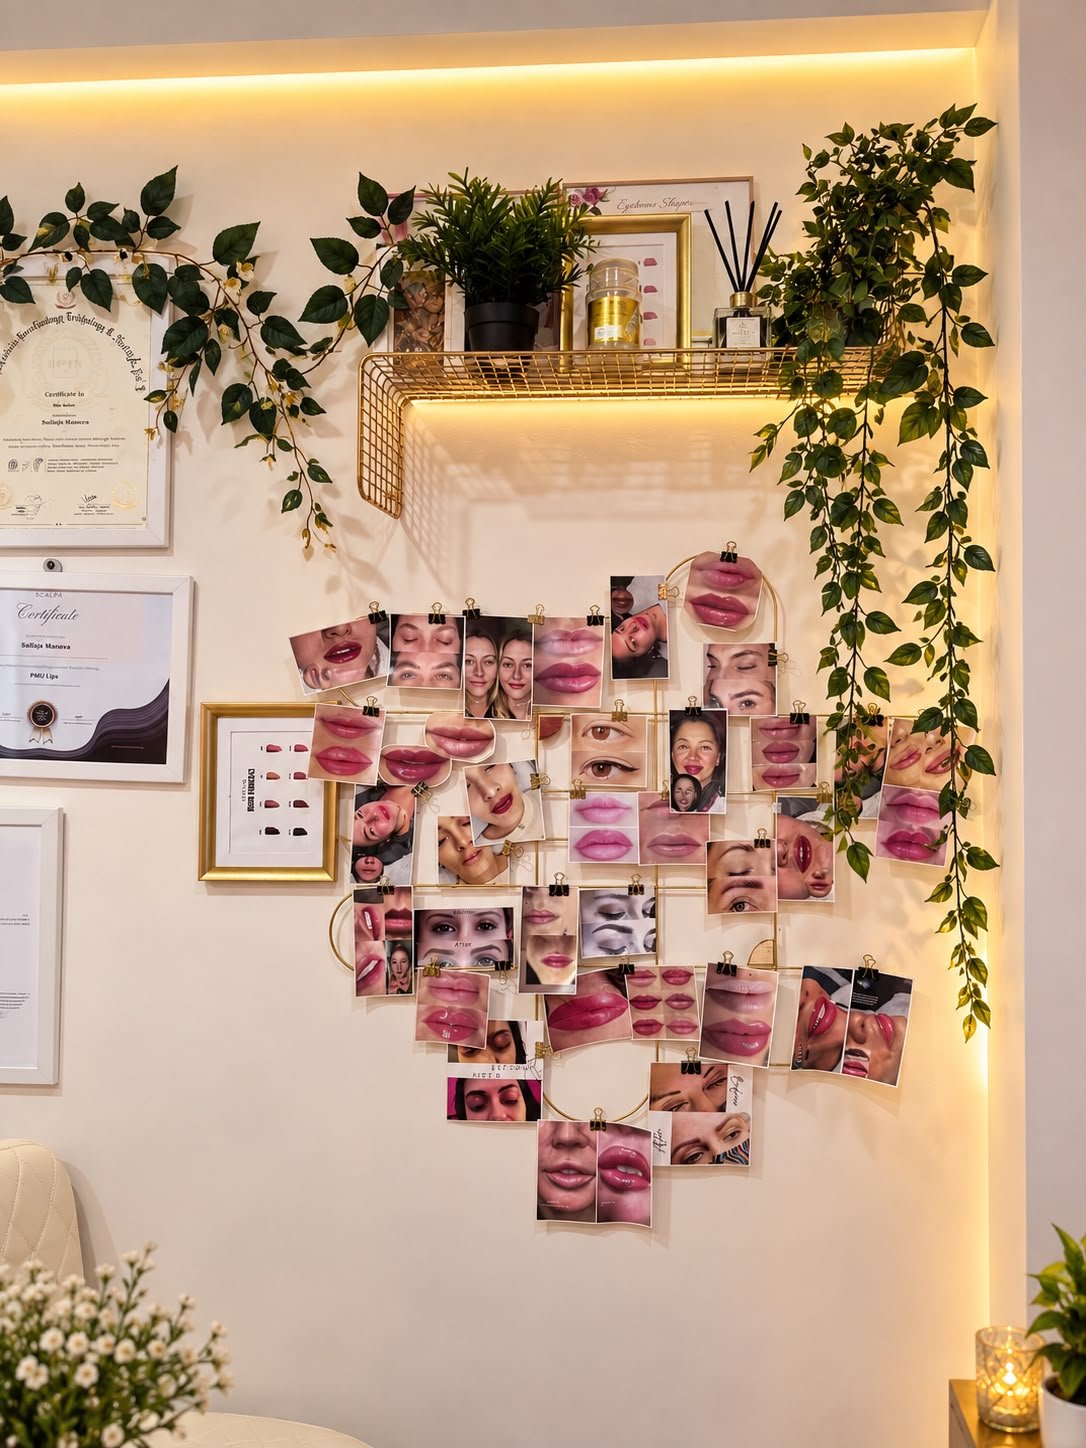
Fayve is a boutique permanent makeup studio in Lokhandwala, Mumbai — founded on one belief: makeup should enhance you, not mask you.
Every treatment begins with a detailed face-mapping consultation. We study your features, skin tone, and lifestyle before a single stroke is made. The result? Brows, lips, and liner that look like they were always yours — because they were designed to be.
Our artist is internationally certified (Scalpa California) and works exclusively with premium, skin-safe pigments and single-use sterile tools.
Fine, individual hair strokes designed to restore the appearance of naturally fuller brows.
Enquire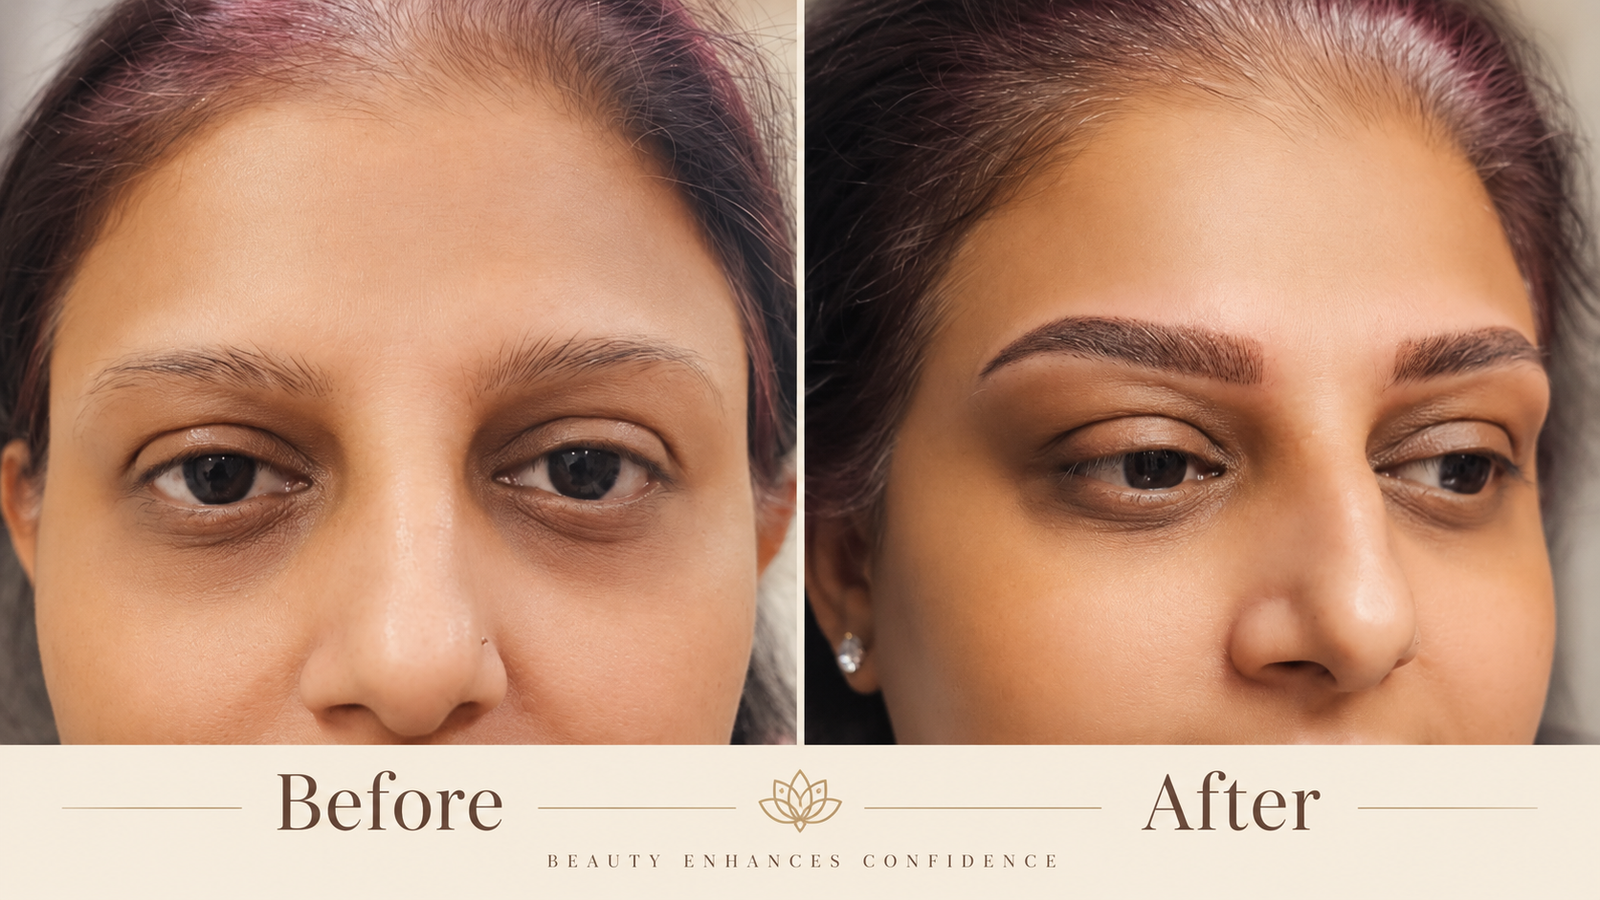
Fine hair strokes with soft shading for a fuller, dimensional brow.
See Before & After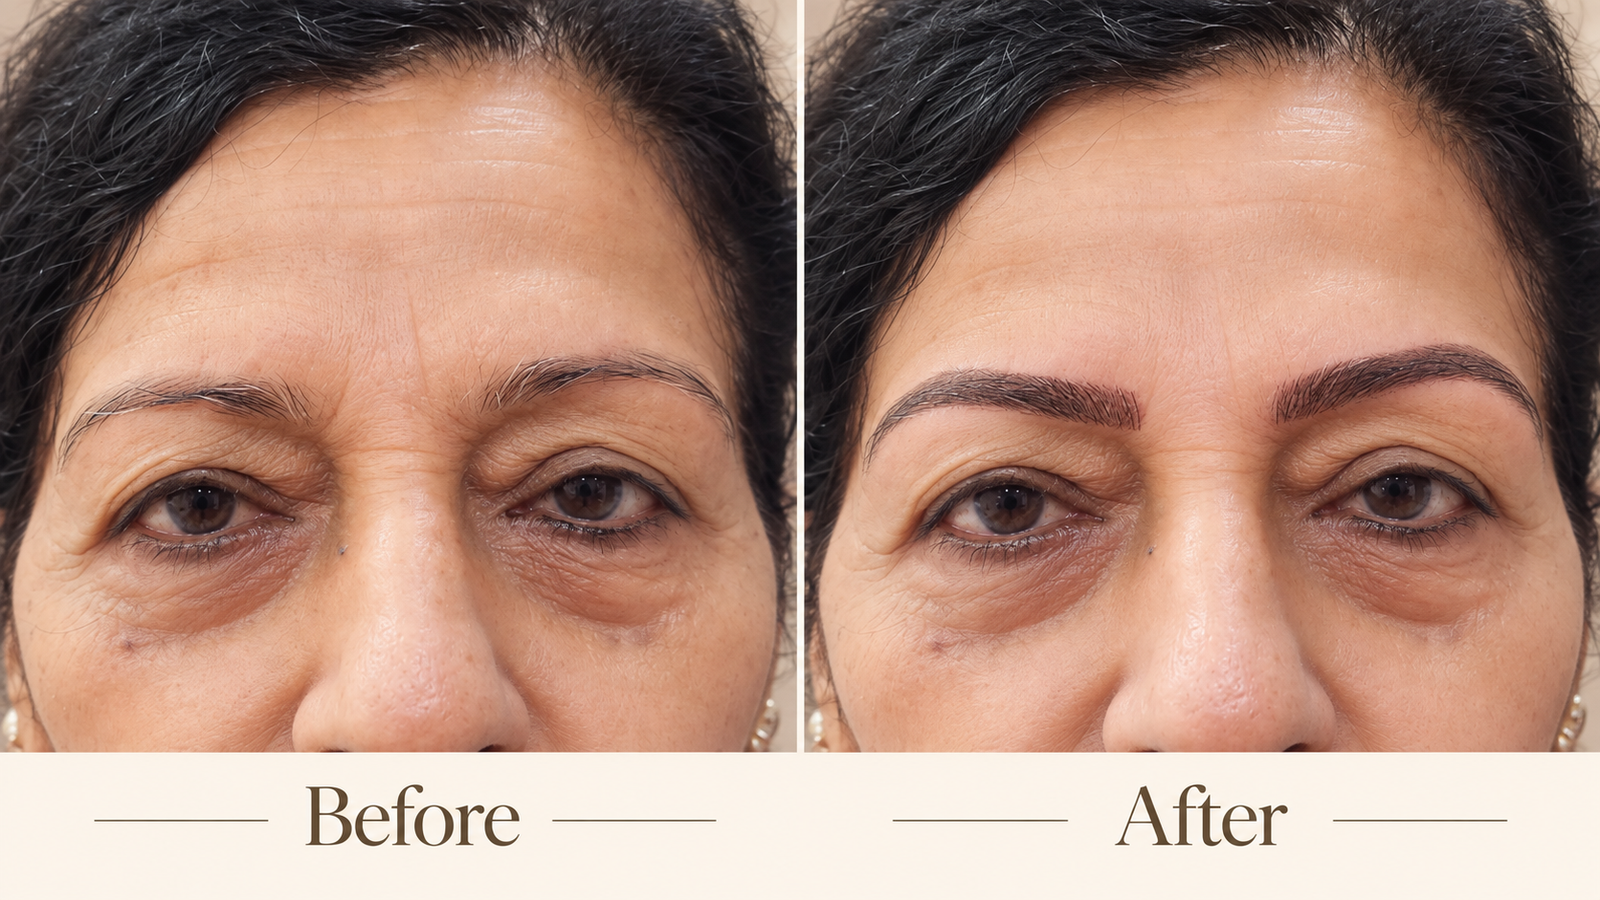
Softly shaded definition, with a lighter front and a more defined tail.
Enquire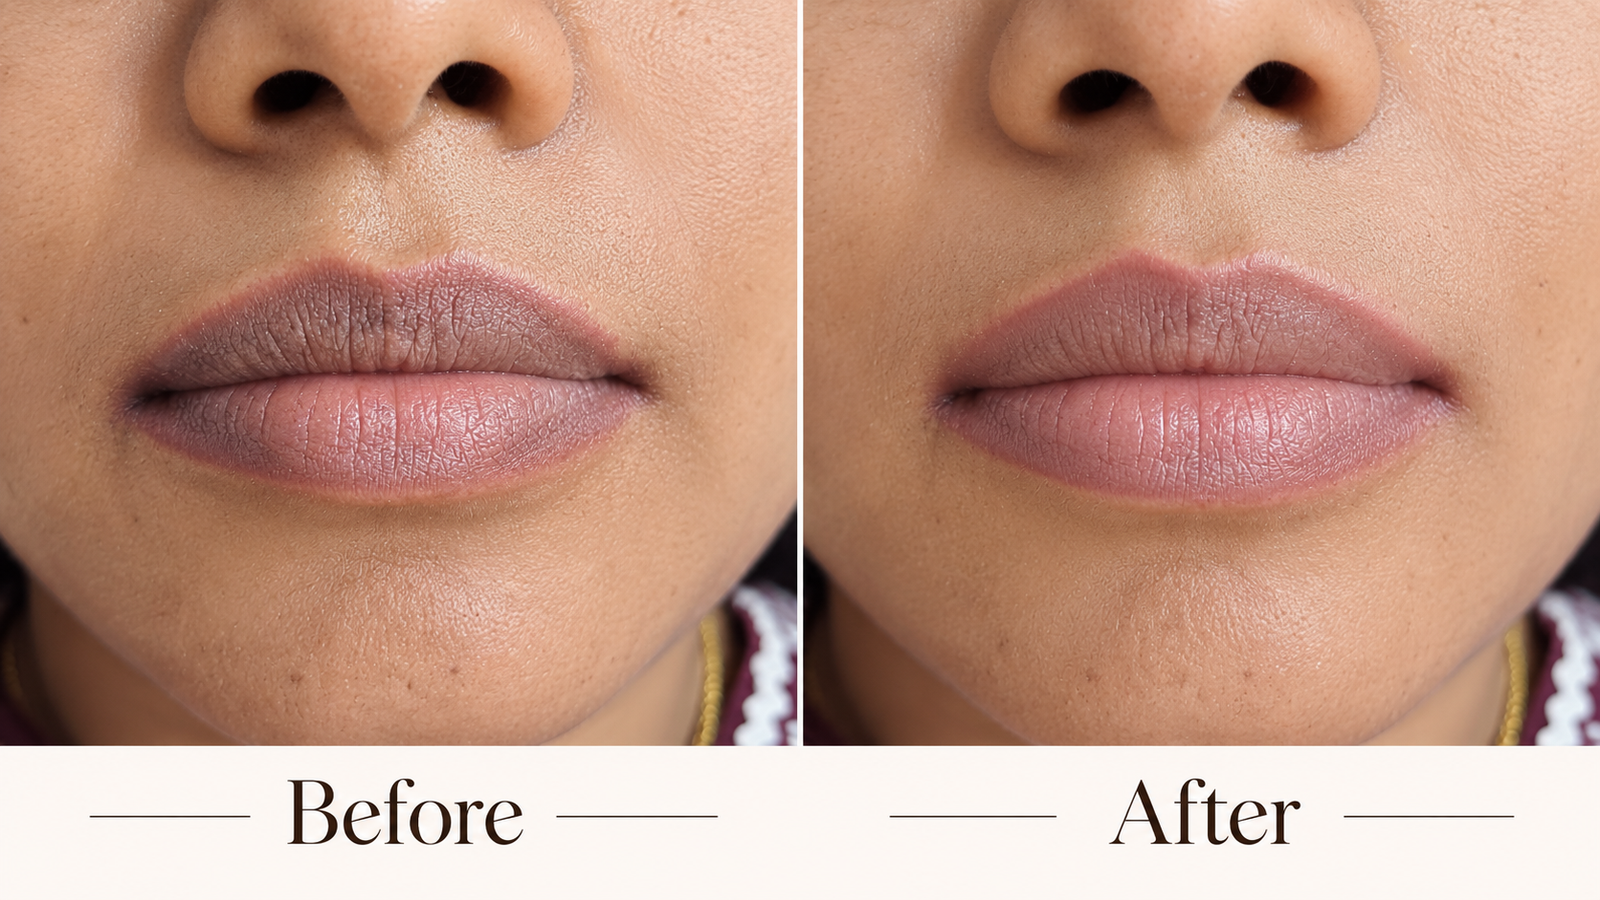
A subtle enhancement of your natural lip colour and definition.
Enquire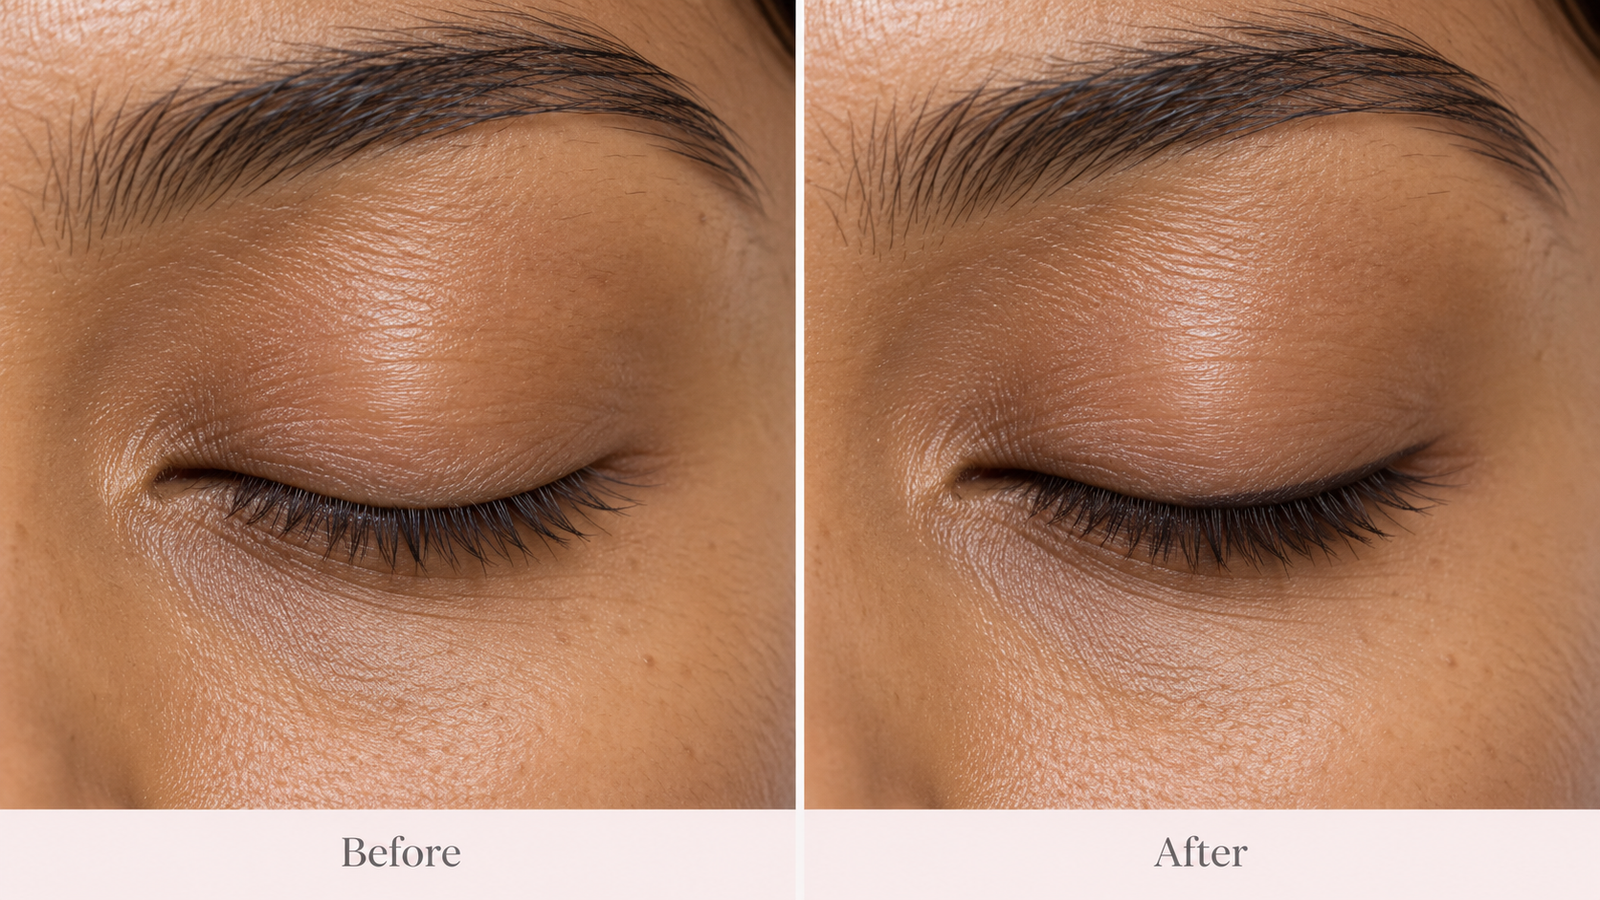
Lash-line definition designed around your eyes and preferred finish.
Enquire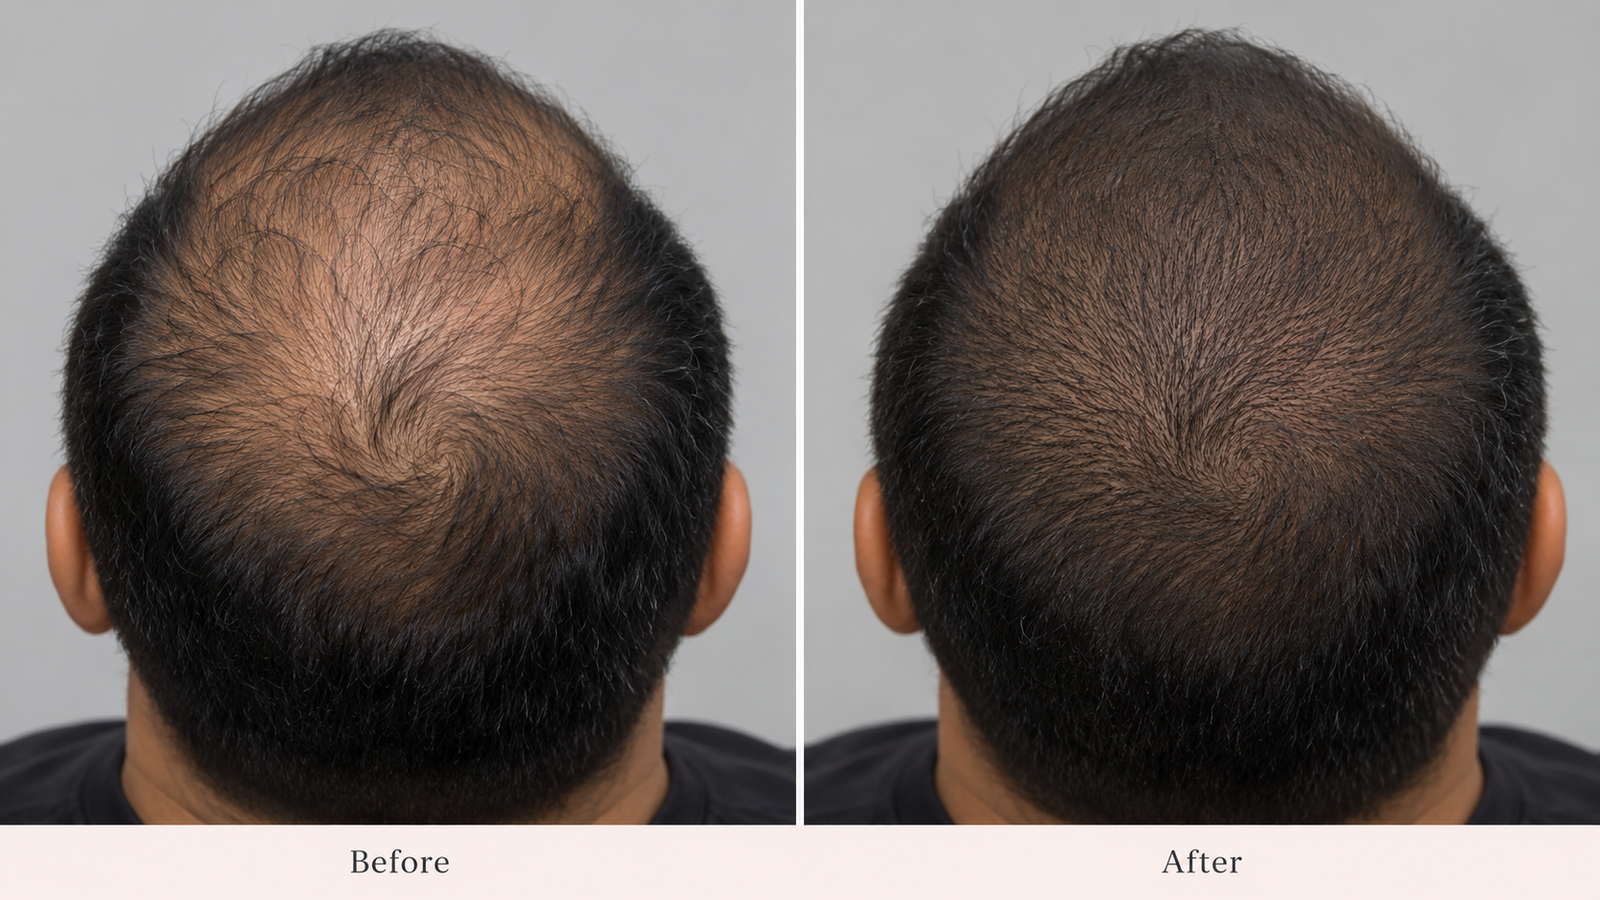
Carefully placed pigment to create the appearance of greater hair density.
EnquireClient-facing, educational and premium — because with permanent makeup, understanding the process matters as much as the result.
Nano Brows are a Permanent Makeup technique designed to recreate the visual appearance of individual brow hairs using ultra-fine, machine-created strokes. The intention is not to create a heavy or obviously tattooed brow. The goal is to restore the impression of natural brow hair where the brows appear sparse, uneven, over-plucked or thinner than desired.
The front of the brow can remain soft and airy while the body and tail are developed according to the client’s natural pattern. We consider natural hair direction, existing density, facial proportions, desired shape, skin characteristics, colour and undertone. The closer someone looks, the more natural the brow should appear.
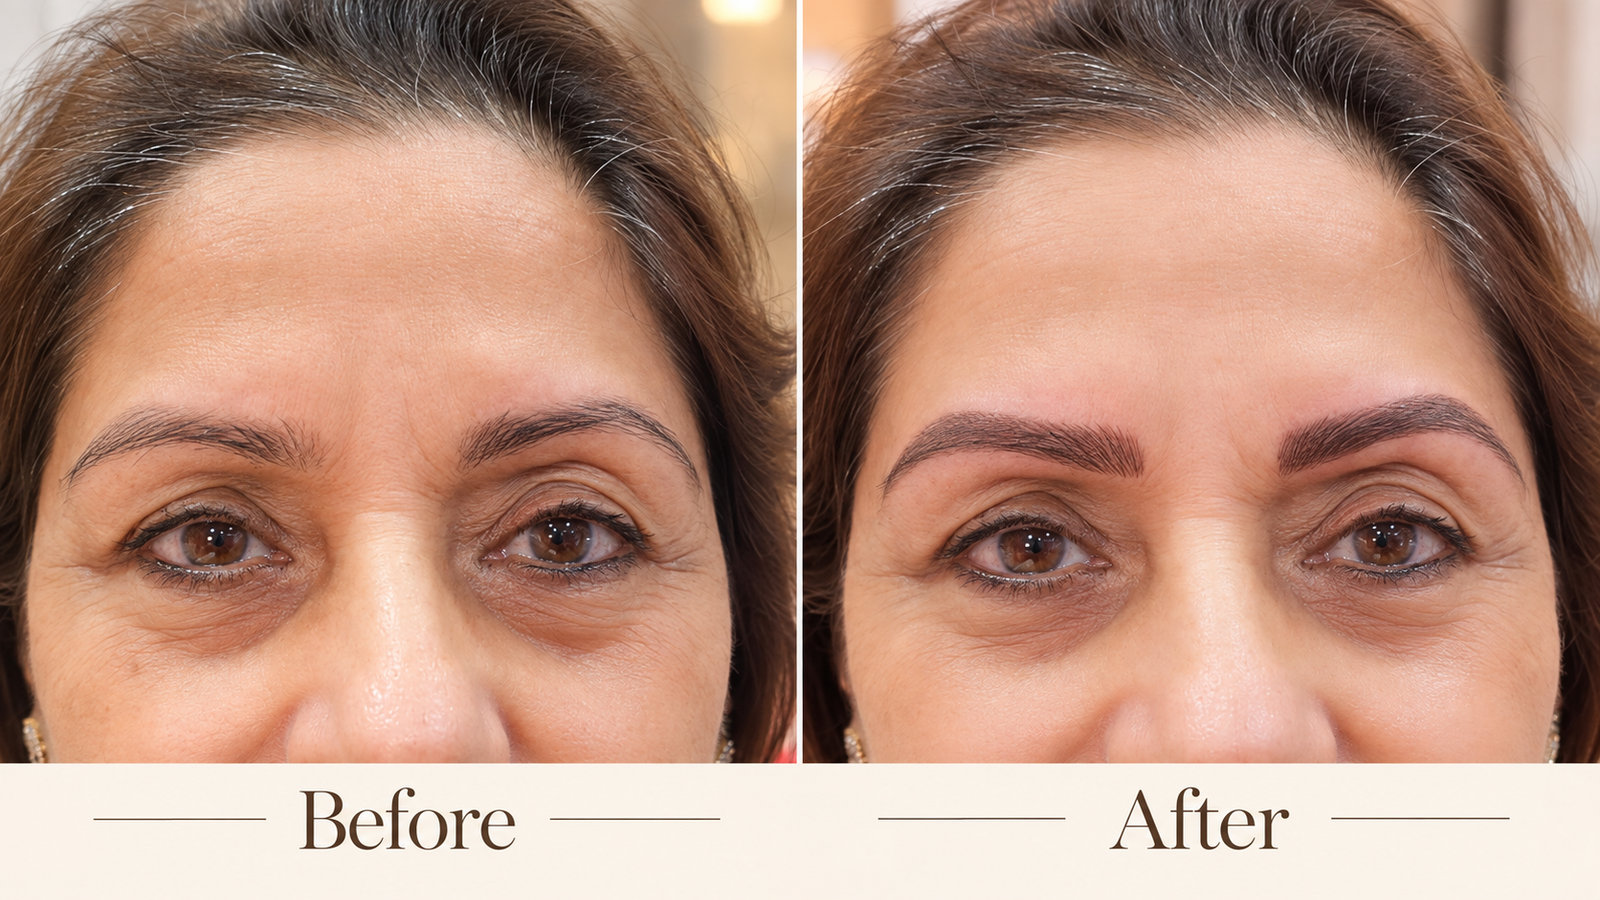
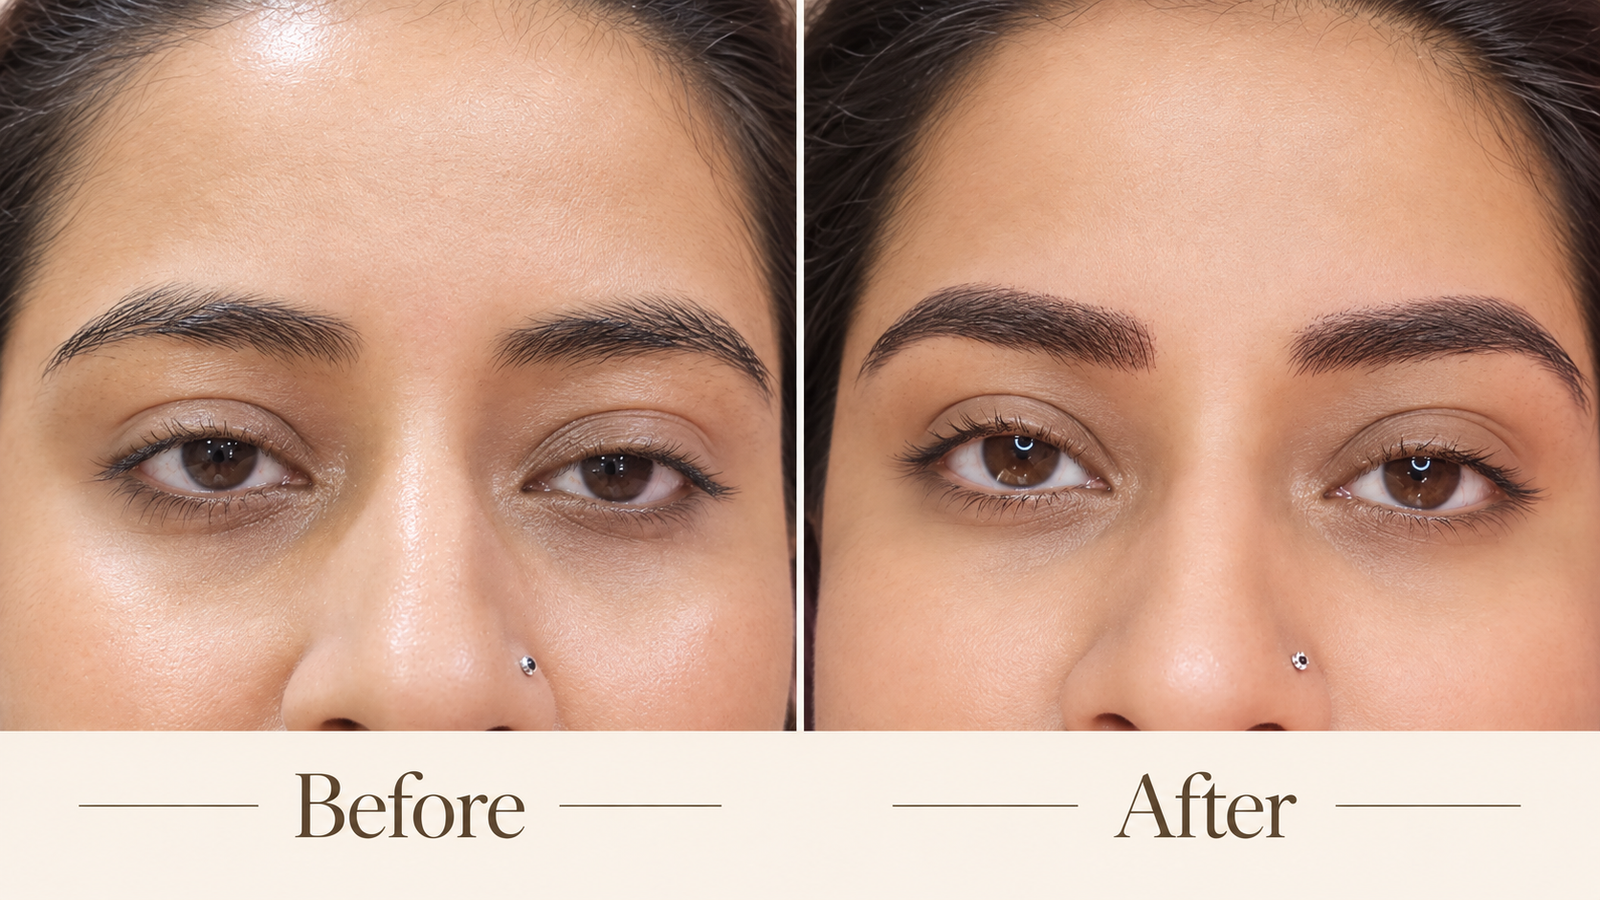
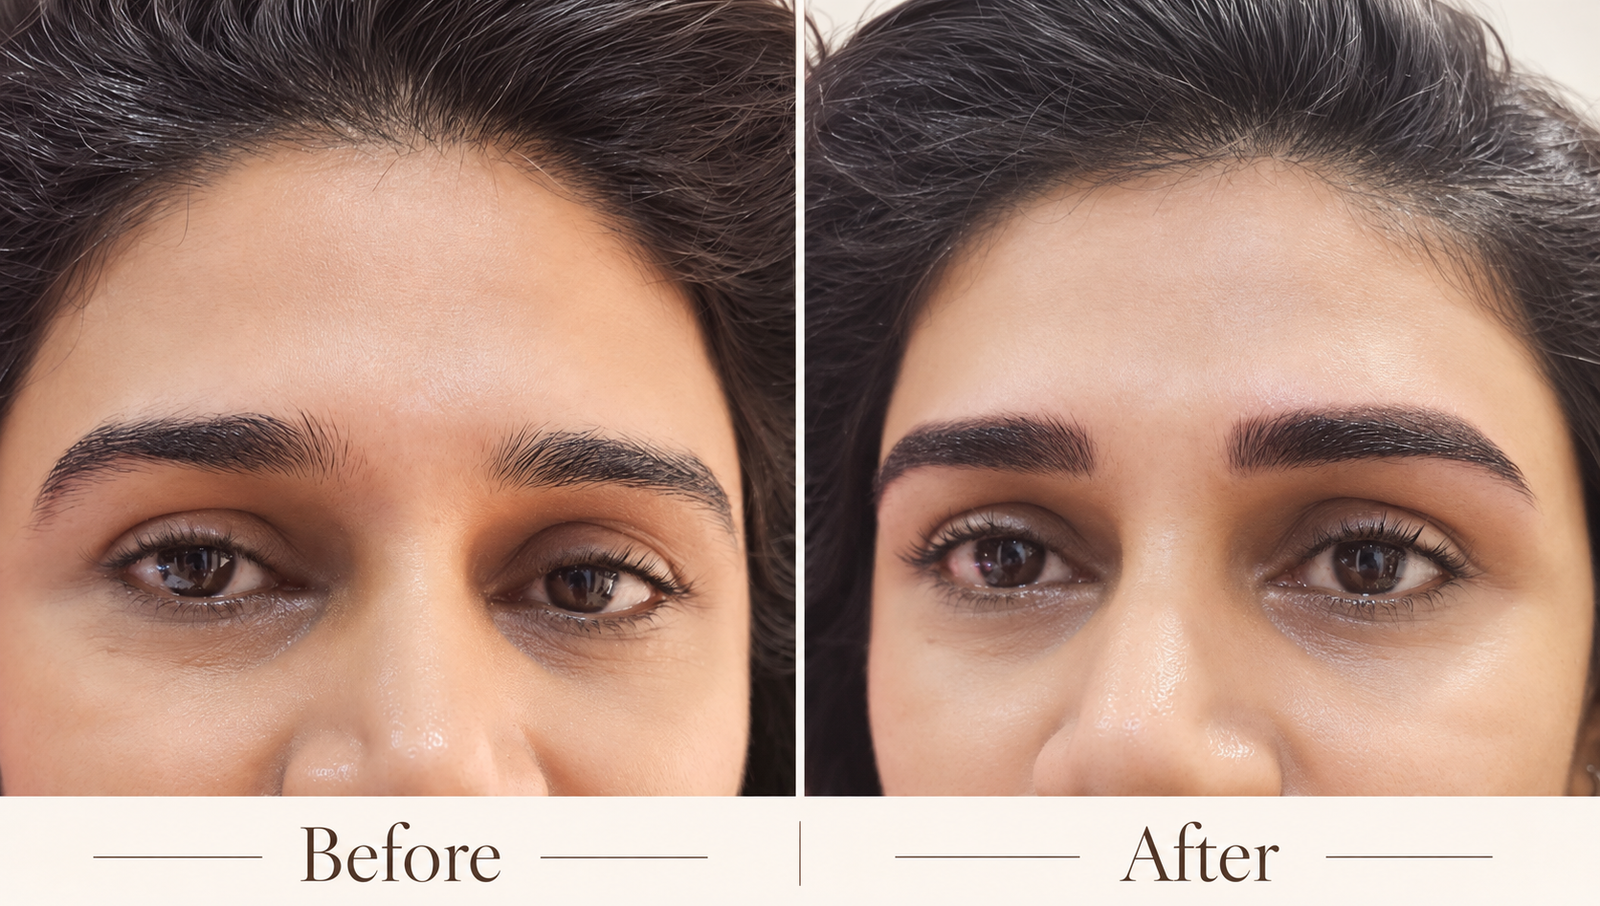
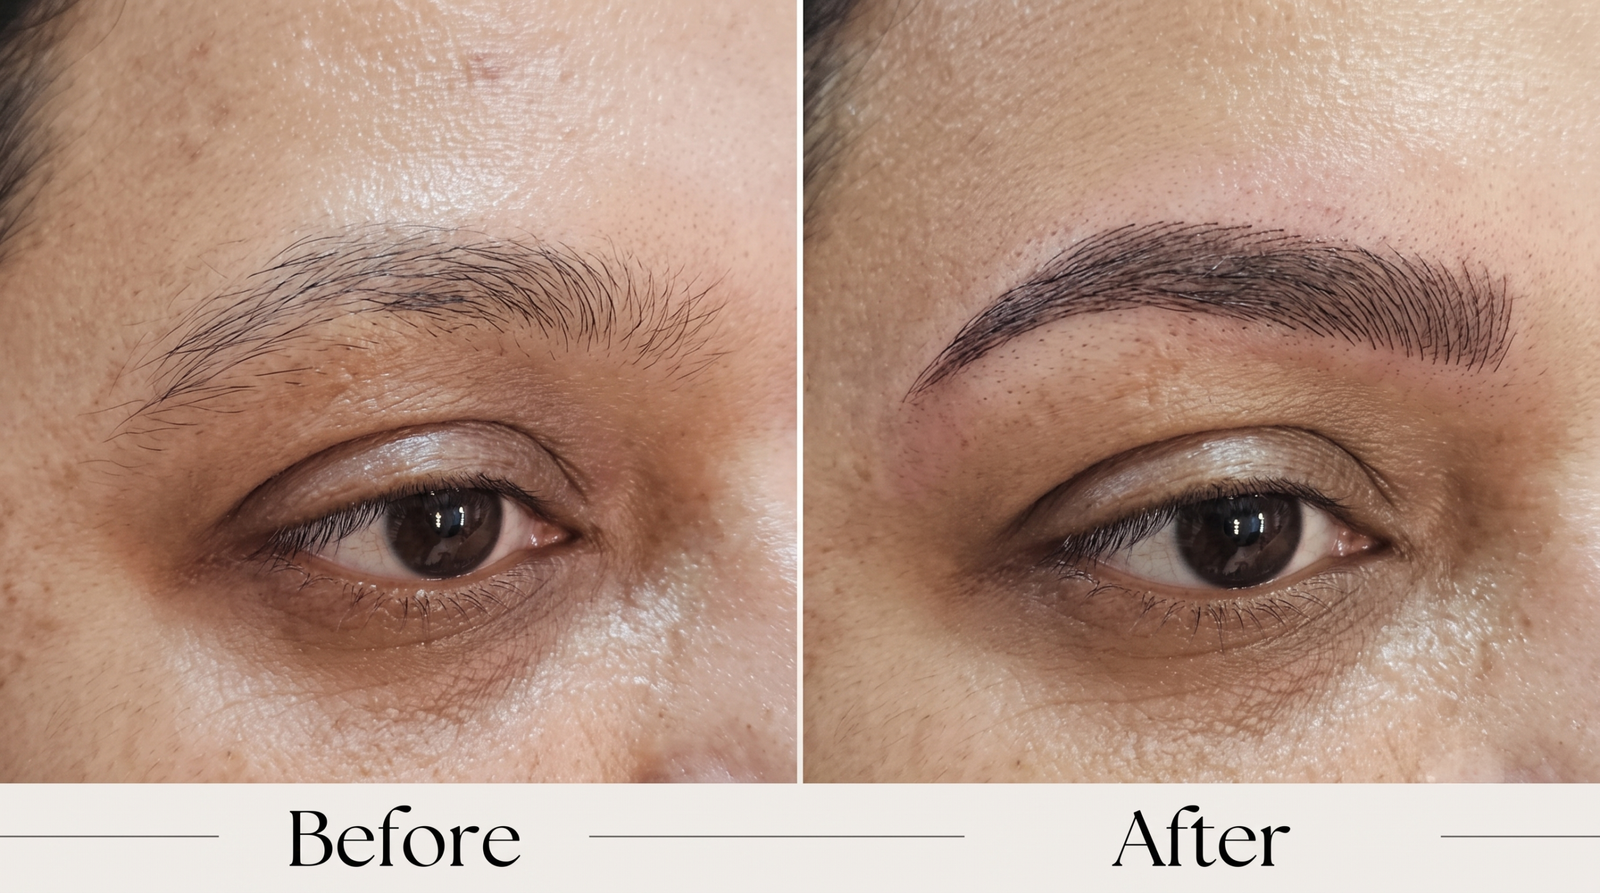
Combination Brows combine two visual effects: fine hair-like strokes and soft shading. The strokes create a natural-looking beginning, while shading adds density through the body and tail. This creates a fuller, dimensional brow without making the entire brow look like one solid block of pigment.
See real Combination Brow before & after results →
Powder Brows create a soft, shaded appearance similar to the effect of brow makeup. Ombré Brows take the concept further by creating a deliberate graduation: a lighter front, fuller body and more defined tail.
Powder Brows: a soft, diffused shading effect throughout the brow. Ombré Brows: a graduated effect with a softer front and stronger definition towards the body and tail.
| Feature | Nano Brows | Combination Brows | Powder Brows | Ombré Brows |
|---|---|---|---|---|
| Main effect | Individual hair-like strokes | Hair strokes + soft shading | Soft, diffused shading | Graduated shading |
| Technique | Fine machine-created strokes | Fine strokes combined with controlled shading | Pixelated / diffused shading throughout | Shading that gradually increases in intensity |
| Front | Hair strokes | Hair strokes | Soft, diffused | Very soft / airy |
| Body | Hair strokes | Hair strokes + shading | Shaded | More defined shading |
| Arch | Natural, hair-like | Defined but dimensional | Structured through shading | Defined and sculpted |
| Tail | Soft, natural | Defined | Defined | Most defined area |
| Overall look | Barely-there, hair-like | Natural + dimensional | Softly made-up | Polished + graduated |
| Finish | Hair-like | Natural + dimensional | Makeup-inspired | Soft makeup-inspired |
| Definition | ★ Softest | ★★ Medium | ★★★ Defined | ★★★ Defined with gradient |
| Density | Creates the appearance of individual hairs | Adds both texture and density | Creates overall visual density | Creates graduated visual density |
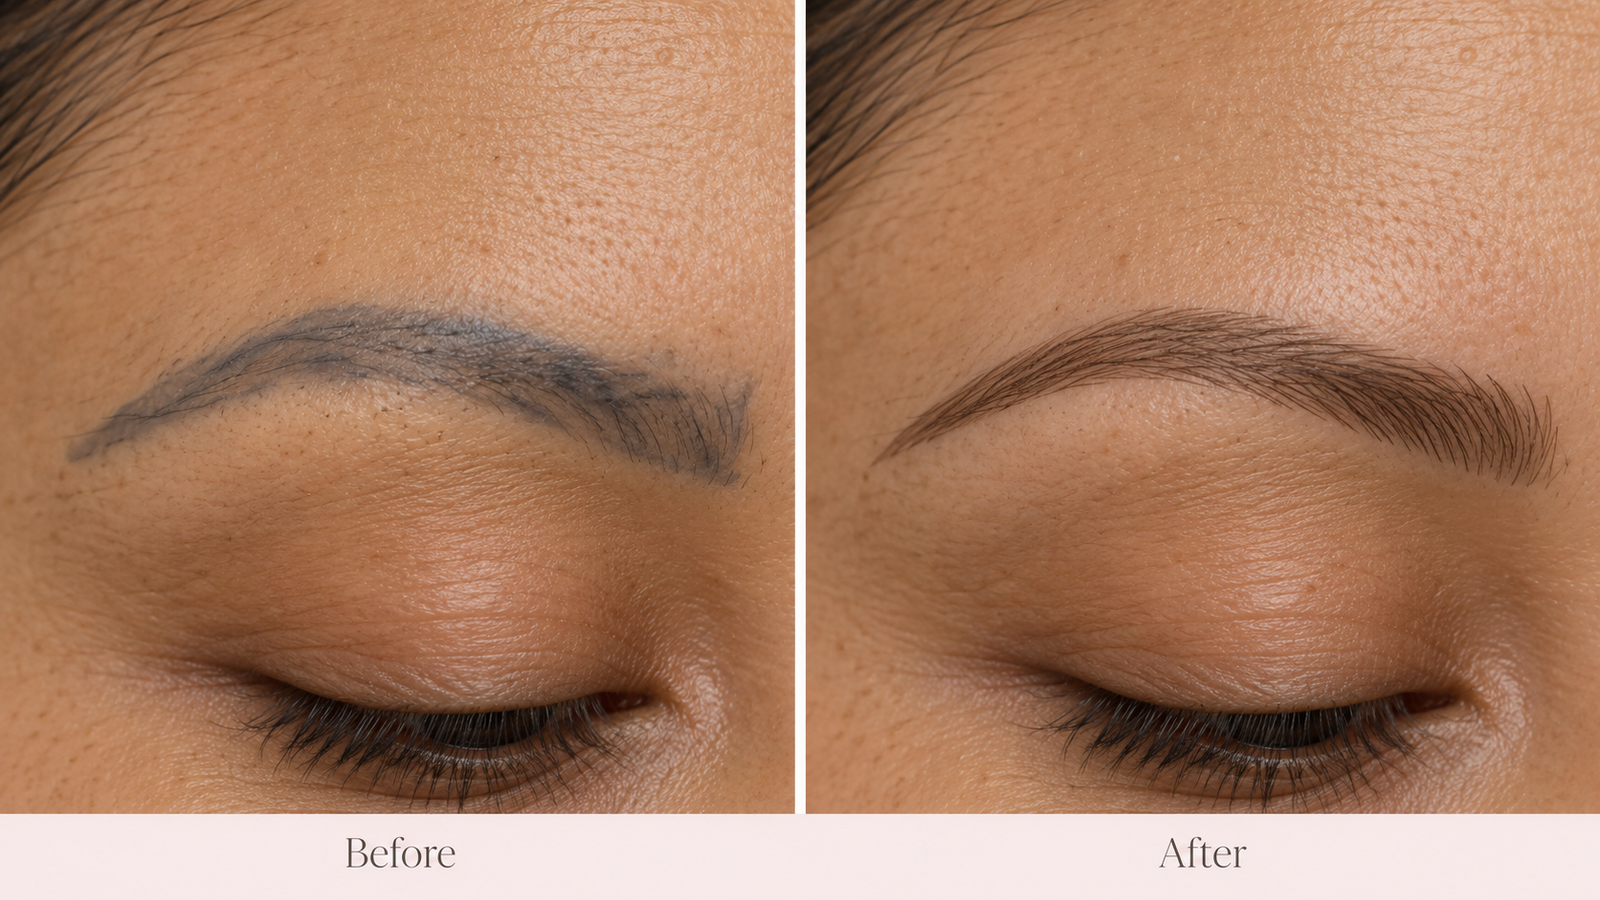
Sometimes — but all previous brow work needs to be assessed before we decide which treatment is appropriate. Whether you are considering Nano Brows, Powder Brows, Combination Brows or another brow enhancement, existing microblading or permanent makeup can affect the colour, shape and healed result of your new brows.
If previous brow work has faded to a grey, blue-grey, ashy, reddish or otherwise unwanted tone, simply placing a new pigment over it may not create the clean, natural result we want. The existing pigment underneath can continue to influence the healed colour and overall appearance. At FAYVE, we first assess the existing pigment, its colour, saturation, depth, placement and the amount of natural brow hair remaining. Based on this assessment, we determine whether the old work can be corrected and worked with, or whether removal or lightening would be more appropriate before creating a new brow.
What happens when old pigment has changed colour?When previous brow work has healed grey, ashy, blue-grey, reddish or another unwanted tone, the objective is usually to neutralise the underlying colour before introducing the desired new brow colour. This process applies to all brow treatments, not only Nano Brows.
Assess → Neutralise → Heal → Reassess → Introduce New Colour
We don’t believe in simply putting new pigment over old pigment and hoping for the best. We assess what is already there, understand the underlying colour, correct what needs correcting, allow the skin to heal, and then design the new brow around the healed canvas. The goal is not simply to create a beautiful fresh brow. The goal is to create a beautiful healed brow.
Lip Blush is a PMU technique designed to enhance the appearance of natural lip colour and definition. It is not intended to replace lipstick. The aim is a softer, more effortless appearance with improved visual freshness, colour and definition.
Your colour is not chosen from a generic pink chart. Pigment strategy considers your natural lip tone, skin undertone, existing pigmentation and desired healed colour. The same pigment does not heal identically on every client, which is why individual assessment matters.
Sessions & longevityA minimum of 2 Lip Blush sessions is recommended to build the colour properly and help achieve better, longer-lasting results, performed with a 21-day gap so the lips can heal and the colour can settle before the next session. The first session establishes the initial colour and definition; the second reinforces the pigment for a more even, consistent, long-lasting result. After completing the two sessions, Lip Blush can typically last around 1–2 years depending on skin type, skincare routine, sun exposure, aftercare, lifestyle, pigment retention and individual healing response. As the pigment fades, the lips move closer to their natural colour, and a colour refresh can be performed to boost the existing colour.
If a client is planning both treatments, the current FAYVE website guidance is: Lip filler first → allow it to fully settle → reassess → Lip Blush. The rationale is that filler changes lip volume and shape, while Lip Blush mapping should be based on the final lip shape. Filler can also cause temporary swelling or bruising, and the final result can take around 2–4 weeks to settle. Lip Blush should not be performed while tissue is still swollen or healing from injections.
As a general planning interval, allow approximately 4–6 weeks after filler before having Lip Blush, particularly so that swelling and any temporary changes in shape have resolved — the exact timing should be confirmed by the clinician who performed your filler and your PMU artist. If Lip Blush is performed first and fully healed, it establishes the visual definition of the lips, giving the injector an established, settled shape and definition to work with: Lip Blush → Complete healing → Lip Filler, performed by an appropriately qualified medical professional. If you already have Lip Blush and want filler, the current guidance recommends the injector see the healed Lip Blush result before deciding where and how much filler to place.
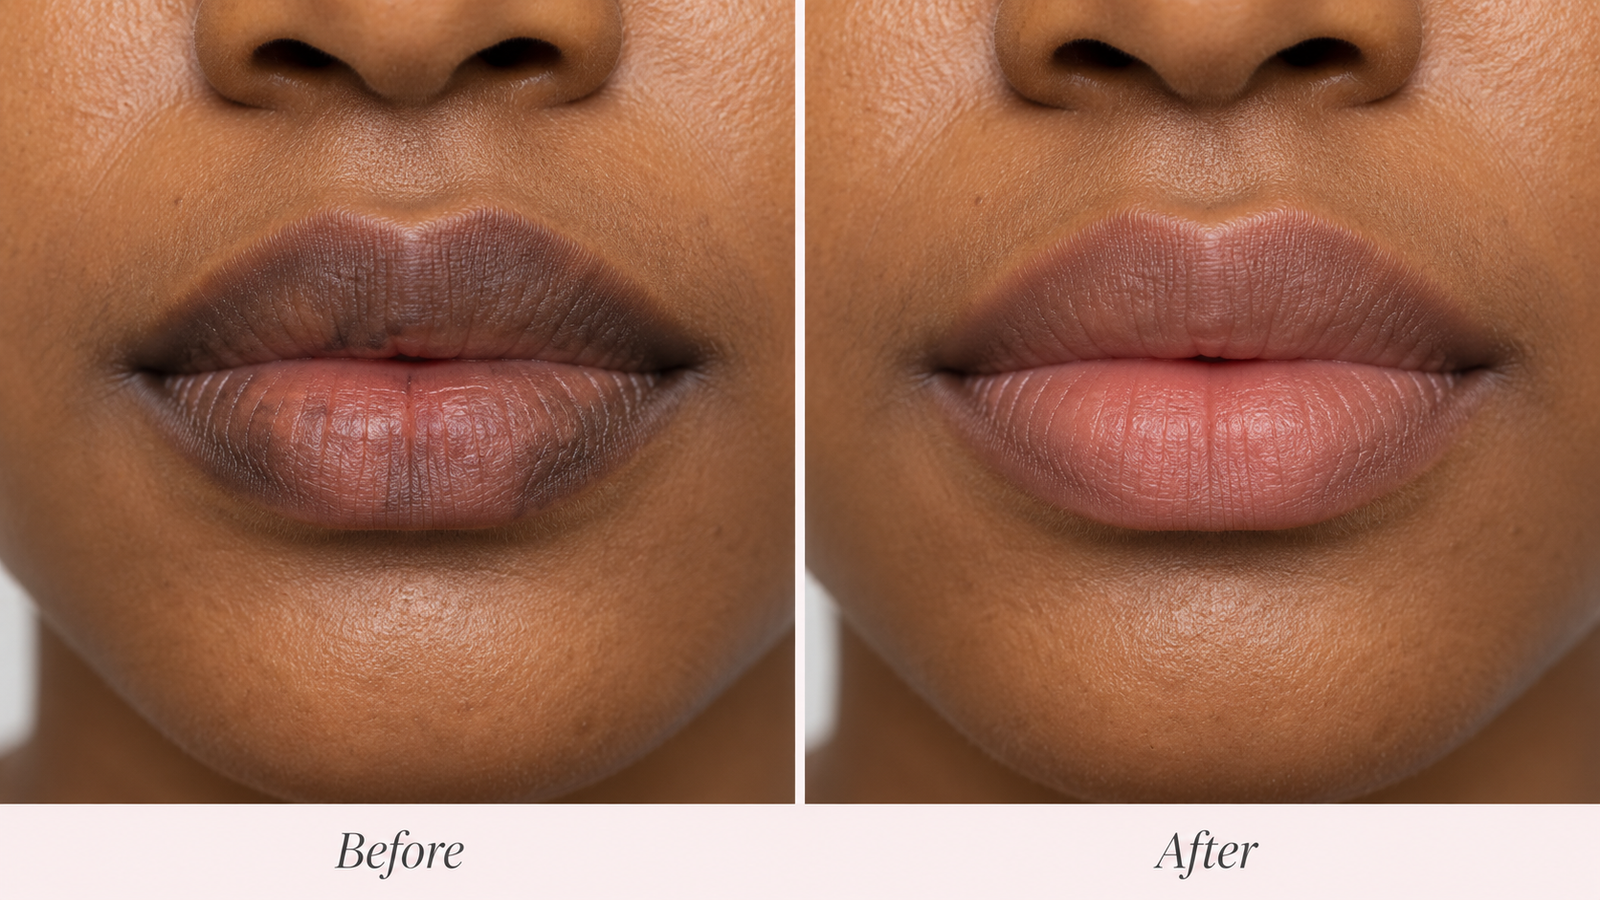
Dark or uneven lip pigmentation requires a different approach from standard Lip Blush. Instead of simply placing a lighter pigment over darker areas, treatment is planned around the underlying tones and the way the individual lips are likely to respond.
Assess → Neutralise → Heal → Refine
The objective is not to make every lip the same colour. It is to create a more balanced and harmonious result while working with the underlying pigmentation.
Lip pigmentation can be influenced by multiple factors and each client’s lips can respond differently. The depth, distribution and nature of pigmentation affect the treatment plan and the number of sessions that may be required.
Permanent Eyeliner is a specialised PMU technique in which pigment is implanted along the lash line to create the appearance of eyeliner. At FAYVE, the intention is not automatically to create a dramatic, makeup-heavy line. The style is designed around your eyes, natural lash line, lifestyle and desired finish.
Scalp Micropigmentation uses carefully placed pigment to create the visual impression of greater hair density. The treatment is customised according to your existing hair colour, density and desired result. SMP is designed to create a visual effect of greater density — it does not change the underlying amount of hair. The treatment is planned to work with your existing appearance so the result can look subtle and natural.
SMP requires specialised PMU needles designed to create small, controlled pigment impressions that mimic the appearance of individual hair follicles. Unlike brow procedures, where the objective may be to create hair-like strokes or shading, SMP focuses on creating precise follicle-style impressions that blend with the client’s existing hair. Depending on the area being treated, existing hair density, scalp characteristics and desired density effect, different needle configurations may be selected.
SMP is not a one-needle-fits-all procedure. Needle selection can vary depending on the scalp area being treated, existing hair density, hair and skin colour, desired density, the size and appearance of the follicle impression, skin characteristics, and whether the treatment is creating a hairline, adding density or blending into existing hair. The impressions should be small, controlled and appropriately spaced, so they blend visually with the client’s existing hair and create the appearance of natural density. The goal isn’t to make the scalp look tattooed — it is to make the hair look denser.
A PMU treatment is a process — the appointment itself is only the beginning. Fresh PMU is not the final result. Immediately after treatment, the colour can appear stronger and more intense than the healed result. The treated area may also show temporary redness, sensitivity or tenderness. As the skin heals, the colour gradually settles and softens, revealing the true healed result.
These changes can be part of the normal healing process. Do not judge your final PMU result immediately after your appointment — give the treated area time to heal and settle before evaluating the colour and final appearance. That is why at FAYVE, we believe clients should see the complete journey: Before → Fresh → Healed. A beautiful fresh result is only the beginning. The healed result is the real result.
Every face is mapped, measured, and drawn before we begin. You approve the shape; we perfect it.
Internationally certified PMU artist, trained in the latest techniques.
Imported, skin-safe pigments that heal true to colour — no grey, no orange, no surprises.
Hospital-grade sterilisation and single-use needles. No exceptions.
If it doesn't look like you (only better), we don't do it.
Explore the details of each treatment.
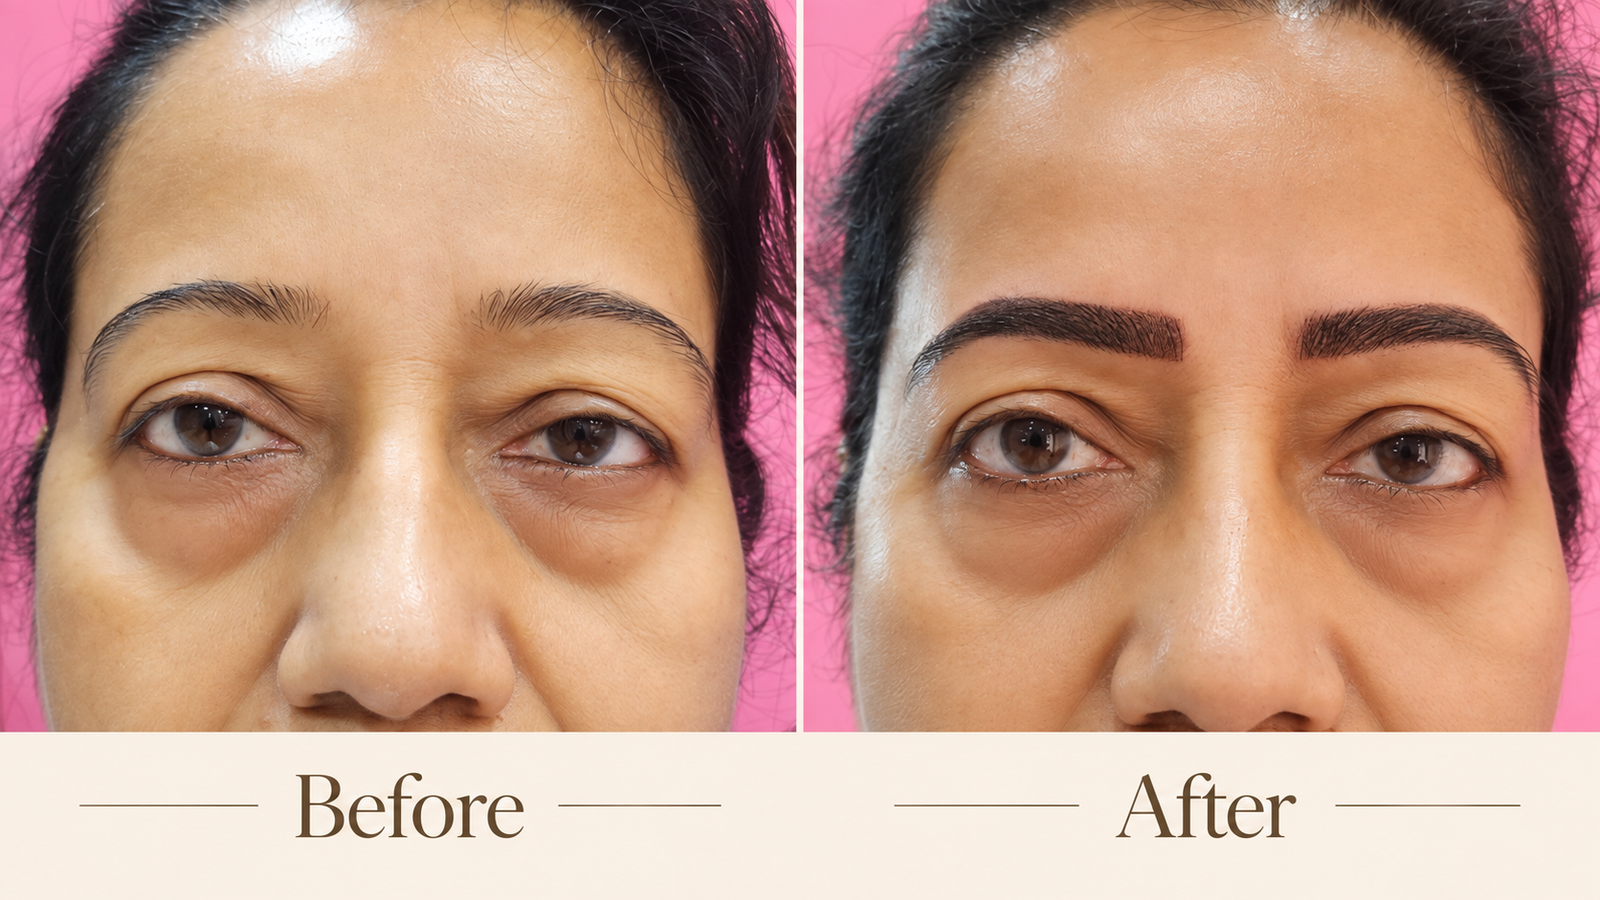
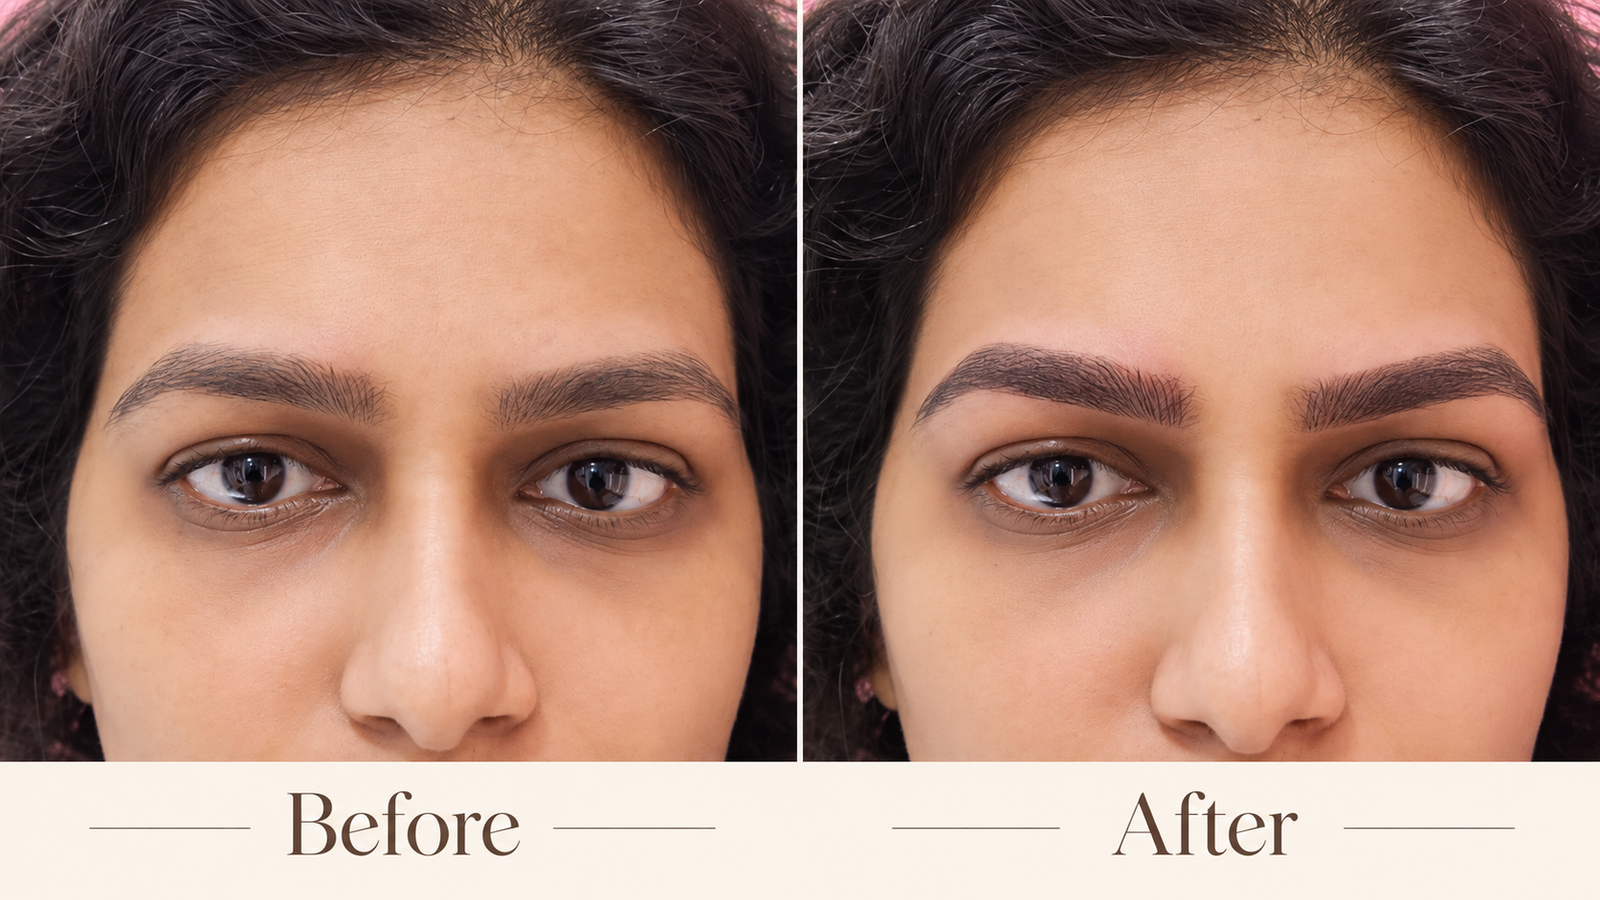
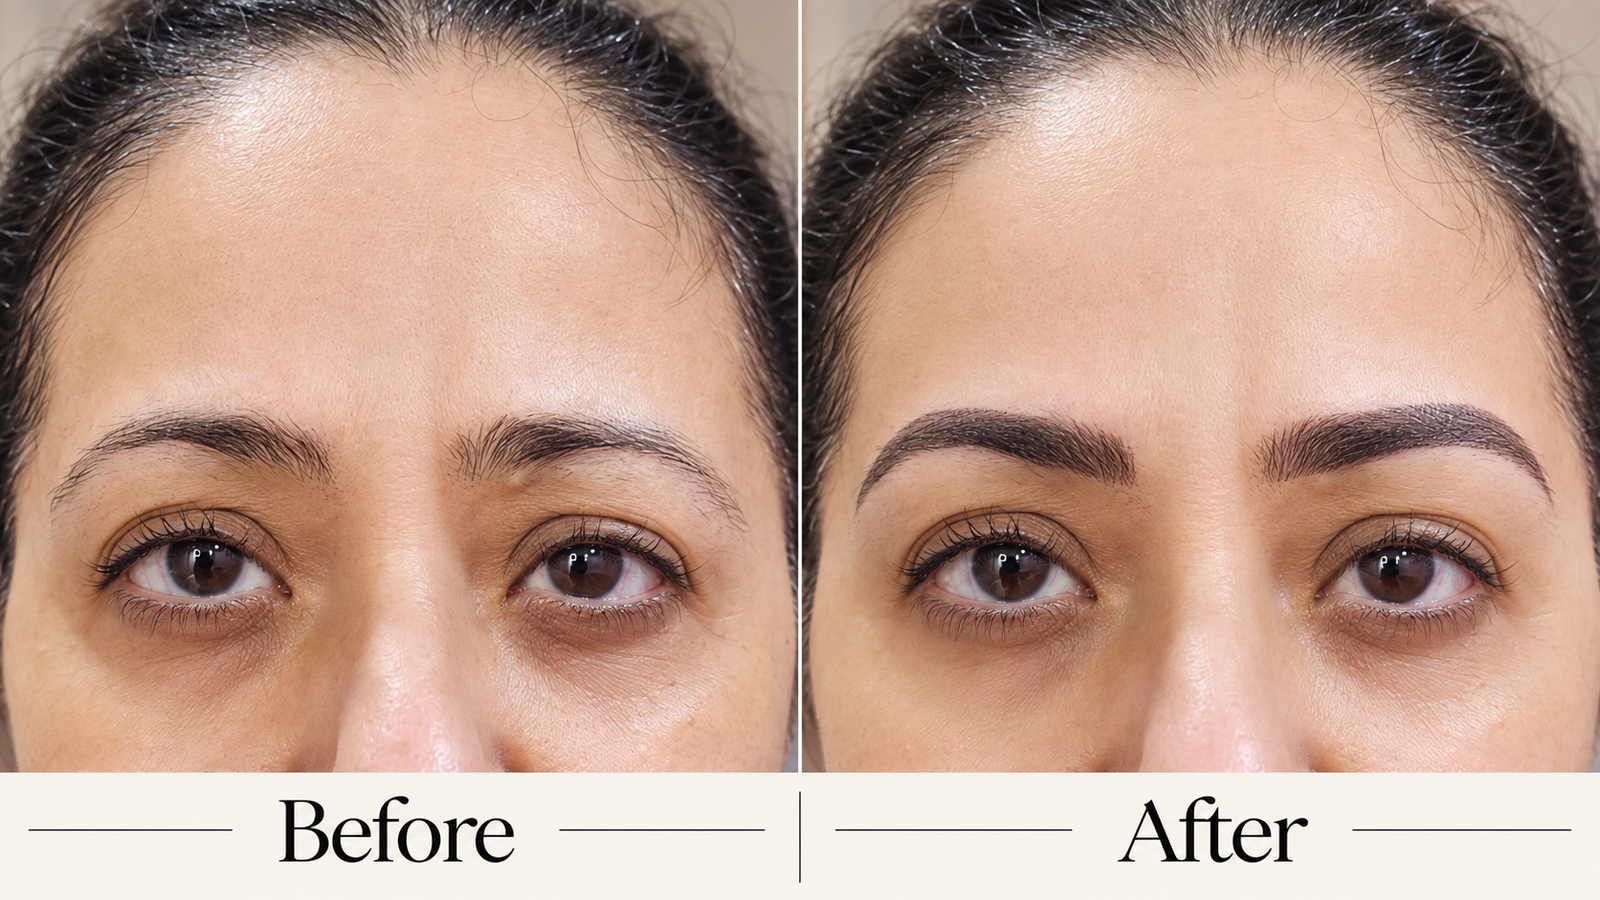
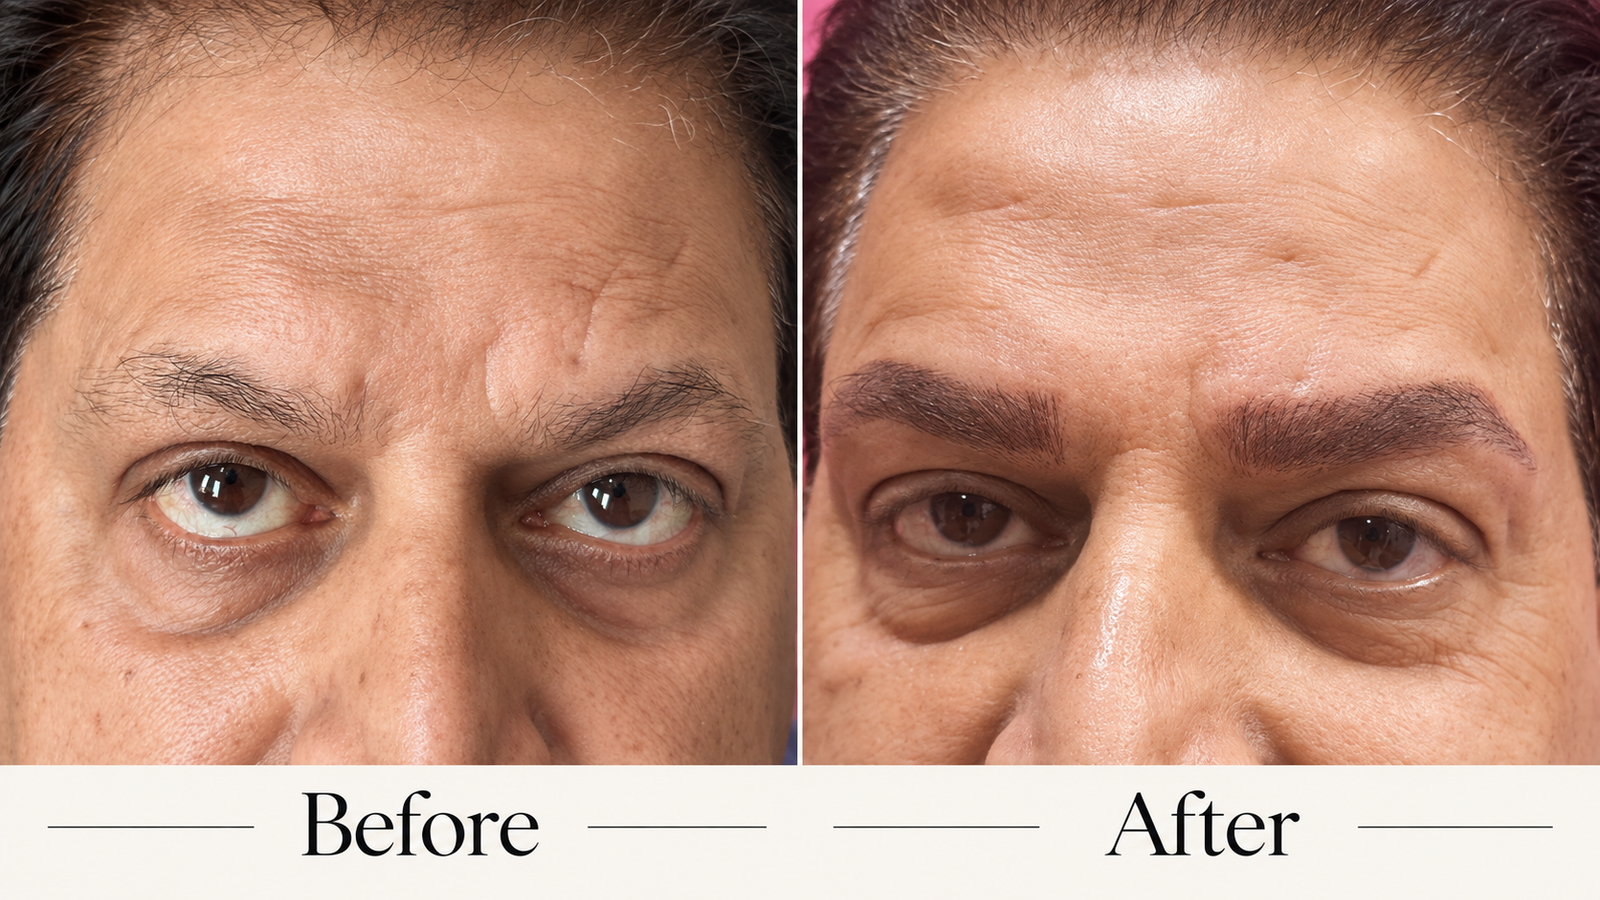
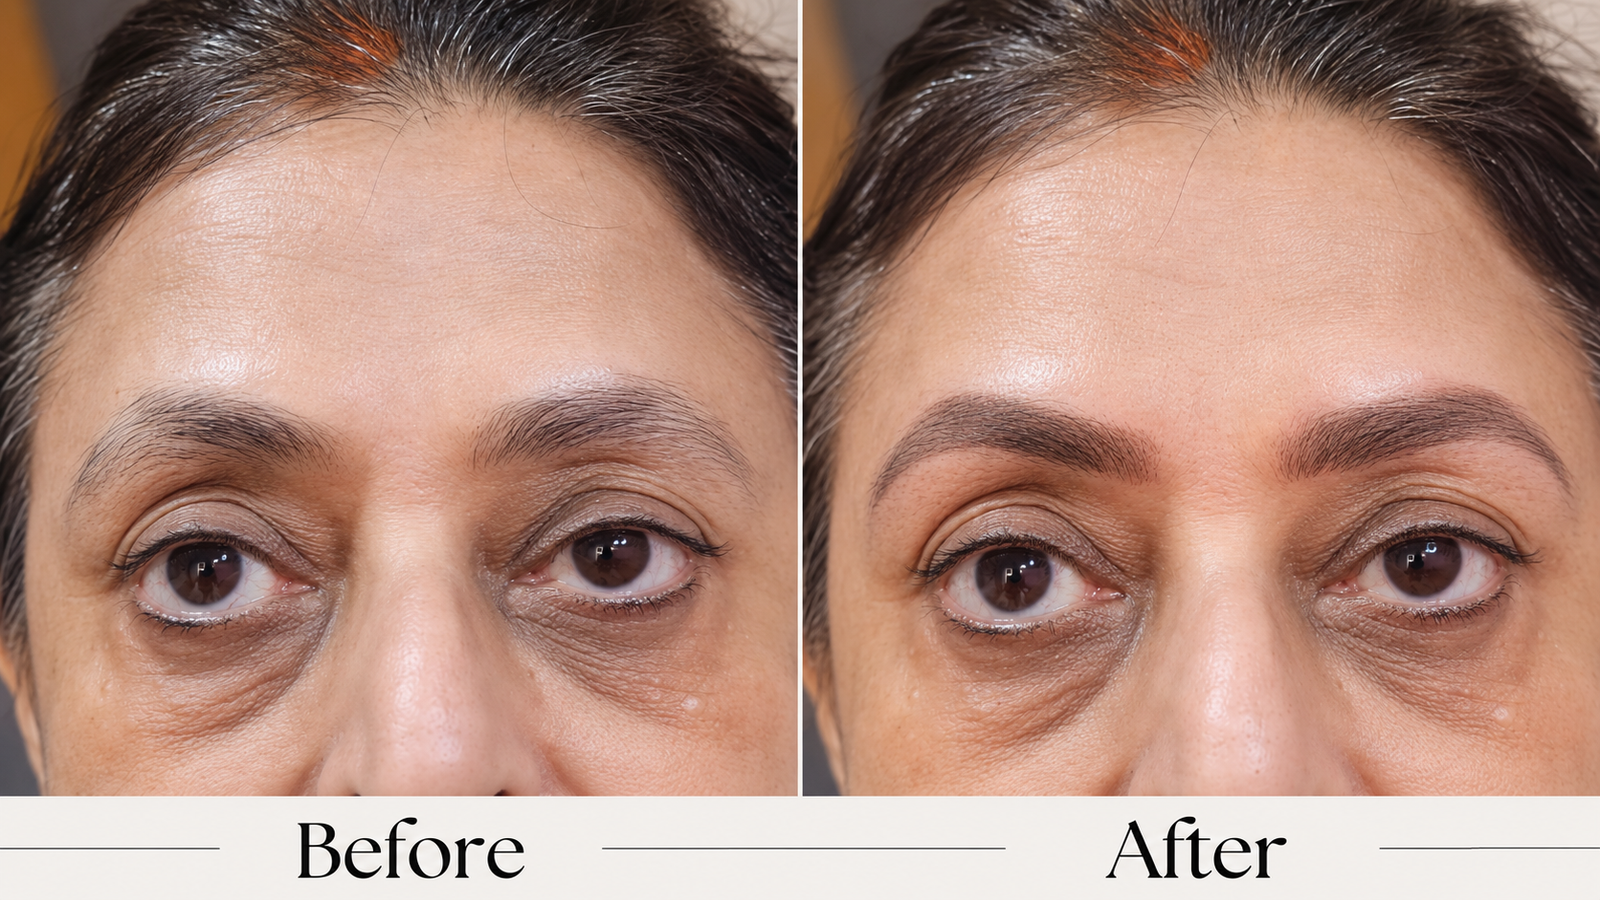
Real clients, real Combination Brow transformations — hair strokes through the front, controlled shading through the body and tail.
Every treatment, every finish, every healing stage — explore our complete service catalog like a magazine, right here on the page.
“Couldn’t be happier with the results! The pigments are top-notch — a natural yet defined look that perfectly complements my features.”
Every question our clients ask, answered in full — organised by treatment.
The objective is a natural, hair-like appearance. The healed result depends on your existing brow hair, skin characteristics, technique, pigment selection and healing response, so no PMU result can be guaranteed to look identical to natural hair.
Not necessarily. Suitability depends on your skin, existing brow work, natural hair, desired finish and other individual factors. A consultation and skin assessment are important before choosing the technique.
They can initially appear stronger or more intense than the healed result. As the skin heals, the appearance generally softens.
You should absolutely be part of the design process. The final design should also respect your facial proportions, natural brow structure and overall facial harmony.
Possibly, but this requires assessment. Existing pigment, its colour, saturation and placement can affect the new treatment. In some cases, correction or removal may be more appropriate than layering new pigment.
Retention varies by skin type, technique, pigment, placement and aftercare.
They are makeup-inspired techniques. Powder creates a softly shaded effect, while Ombré deliberately graduates from lighter to stronger definition. The intensity is planned around your preferred finish.
No. Powder is a soft, diffused shading effect. Ombré has a deliberate graduation, with a softer front and more definition towards the body and tail.
Yes. Natural does not always mean invisible. Your version of natural may be softly structured and defined rather than completely bare-looking.
No. Lip Blush creates a soft tint effect, not a lipstick effect. Lipstick sits on the surface of the lips and can create an opaque, solid layer of colour. Lip Blush works within the lips to create a sheer, translucent wash of colour, allowing your natural lip tone and character to remain visible. Your natural lip colour remains part of the final result, so Lip Blush should look like a tint rather than an opaque layer of makeup. You can still wear lipstick or gloss over healed Lip Blush whenever you want a stronger colour.
Lip Blush is designed to enhance the natural colour and definition of your lips. It can help create the appearance of fresher-looking lips, more even colour, enhanced natural lip tone, better visual definition, improved-looking symmetry and a soft, healthy-looking flush of colour. It does not replace lipstick and does not physically add volume to the lips.
Lip Blush does not physically increase lip volume. However, enhancing the colour and definition of the lips can create the visual impression of better-defined, more balanced lips. If you want actual volume or plumping, that is achieved through a separate treatment such as lip filler.
Lip Blush can enhance the appearance and definition of your natural lip shape. The design is created around your existing anatomy and can help improve the visual balance and symmetry of the lips. It does not physically change the underlying structure or volume of the lips.
The pigment strategy is customised according to your natural lip colour, skin tone, skin undertone, existing pigmentation, natural colour variation, previous lip PMU and your desired healed colour. The same pigment can heal differently on different clients, which is why colour selection needs to be individualised.
No. Fresh Lip Blush is not the final healed colour. Immediately after treatment, the lips can appear significantly stronger, brighter or more saturated than the eventual result. As the lips heal, the colour softens and settles. The healed result, rather than the freshly treated lips, is what should be evaluated.
Freshly implanted pigment can appear more intense than the healed result, and temporary redness or sensitivity can further affect how the colour appears. This is part of the normal healing process. Do not judge your final Lip Blush colour immediately after the procedure.
Yes, depending on the nature and extent of the pigmentation. Mild unevenness may be incorporated into a customised Lip Blush treatment. However, significantly darker or unevenly pigmented lips may require a Dark Lip Neutralisation / colour-correction approach before introducing the desired colour.
Lip Blush is primarily a colour-enhancement treatment. Dark Lip Neutralisation is a colour-correction process. If the lips have significant dark, grey, brown, purple or uneven pigmentation, simply adding a lighter pigment may not produce the desired result — the underlying tones need to be assessed and, where appropriate, neutralised before working towards the desired healed colour.
Possibly, but the approach depends on the type and degree of natural pigmentation. Some clients may be suitable for standard Lip Blush, while others may require colour neutralisation first. A consultation is important because the lips need to be assessed individually before deciding on the appropriate treatment strategy.
Some temporary swelling, redness or tenderness can occur following treatment. The lips can also appear stronger in colour immediately after the procedure. These temporary changes should not be confused with the final healed result.
Lip Blush can go through different stages during healing. Colour can soften and appear uneven at certain points before settling. This is why the lips should be given adequate time to heal before evaluating the final result.
Possibly, but previous PMU must be assessed first. Existing pigment, its colour, saturation, placement and how it has healed can all affect the new treatment. Depending on the existing work, the appropriate approach may be a colour refresh, correction, neutralisation or another treatment plan rather than simply adding new pigment over the old work.
Lip Blush is a tint, not permanent lipstick. The goal is not to give every client the same pink or red lip. The goal is to create a soft, translucent, natural-looking enhancement that works with your own lip colour, skin tone and facial features — your lips fresher, more even and beautifully defined.
A minimum of 2 Lip Blush sessions is recommended to build the colour properly and help achieve better, longer-lasting results. The sessions are performed with a 21-day gap, allowing the lips sufficient time to heal and the colour to settle before the next session. The first session establishes the initial colour and definition; the second session reinforces the pigment and helps build a more even, consistent and long-lasting healed result.
Lip Blush is a process of gradually building colour rather than creating an opaque lipstick effect in one sitting. The first session introduces the pigment and allows us to see how your lips respond and heal. The second session allows us to reinforce and build the colour after the first session has healed, helping achieve a more consistent and longer-lasting result.
The lips need time to heal and settle after the first treatment before additional pigment is introduced. A minimum gap of 21 days allows us to assess how the colour has healed and how well the pigment has been retained before proceeding with the second session, which is then planned based on the healed result rather than treating the lips while still recovering.
The purpose of the second session is not simply to make the lips darker. It is to build, reinforce and even out the colour based on how the first session has healed. The final healed result should remain a soft tint rather than an opaque lipstick effect.
After completing the recommended minimum of two sessions, Lip Blush can typically last around 1–2 years, depending on the individual. Longevity can be influenced by skin type, skincare routine, sun exposure, aftercare, lifestyle, pigment retention and individual healing and skin response.
Lip Blush gradually becomes softer and lighter over time. As the pigment fades, the lips move closer to their natural colour. Once you feel the colour has become too light and you want to restore the tint, a colour refresh can be performed — designed to boost the existing colour, rather than completely recreate the original treatment from scratch.
No. SMP creates the visual impression of greater hair density through pigment placement. It does not change the underlying amount of hair.
The intended look at FAYVE is subtle, natural and density-enhancing. The result is customised to existing hair colour, density and desired appearance.
Yes. Existing hair colour is one of the factors considered when planning the treatment.
A consultation is the appropriate first step because the treatment is customised around your existing hair colour, density and desired result.
The principles of PMU are similar, but the treatment objective is different. Brows use fine strokes and/or shading to recreate or enhance the appearance of eyebrow hair; SMP uses precisely placed pigment impressions to recreate the visual appearance of hair follicles and density. The needle configuration and technique are therefore selected specifically for the scalp and the desired follicle effect.
They should not look like obvious, oversized tattoo dots when the procedure is appropriately designed and healed — the goal is tiny follicle-like impressions that blend with the surrounding hair and scalp. The size, spacing, saturation and placement of each impression are important to achieving a natural-looking result.
They can appear more defined because shading is added through the body and tail. The exact finish is customised, so the aim can still be soft and natural.
Hair strokes create texture, while controlled shading creates additional visual density. Combining the two allows contrast between lighter and more defined areas.
Yes. Our Before & After carousel on this page shows real Combination Brow transformations on our own clients, photographed unretouched. Scroll up to the Before & After section to browse through them.
Sometimes, but all previous brow work needs to be assessed before we decide which treatment is appropriate. Whether you are considering Nano Brows, Powder Brows, Combination Brows or another brow enhancement, existing microblading or permanent makeup can affect the colour, shape and healed result of your new brows.
Neutralisation and removal are not the same thing. Neutralisation is designed to correct or balance an unwanted colour so the existing pigment becomes less visually problematic and, where appropriate, can be incorporated into a new brow design. If the old pigment is very dark, heavily saturated, too deeply implanted, significantly outside the desired shape, or otherwise unsuitable for correction, neutralisation alone may not be the right approach — pigment lightening or removal may need to be considered first.
Not necessarily. Every previous brow treatment behaves differently. The number of stages required depends on the original pigment, how much remains, its colour, saturation, depth, previous procedures and how your skin responds during healing. The most important thing is not to rush the process.
Usually, the skin needs time to heal before another permanent makeup procedure is considered. The exact timing depends on the correction performed and the condition of the skin. The healed result should be reassessed before deciding whether and when the new brow treatment can be created.
If the old pigment is sufficiently light, appropriately positioned and compatible with the desired new design, a new brow treatment may sometimes be performed without a separate neutralisation stage. However, every previous permanent makeup case is different, and a consultation is essential before deciding whether to proceed, neutralise, lighten or remove the existing pigment.
Yes. The same assessment and colour-correction principles apply whether you are considering Nano Brows, Powder Brows, Combination Brows, Ombre Brows, or a brow refresh or colour boost. The specific technique may change, but the existing pigment must always be assessed first.
Both sequences can be considered, but they have different advantages. If Lip Blush is performed first, it establishes the visual definition and shape of the lips, and once fully healed, the injector can assess the defined lip shape when planning filler. If lip filler is performed first, the filler needs to completely settle before Lip Blush is performed so the PMU artist can design the treatment around the final, settled lip shape.
When Lip Blush is performed first and fully healed, it establishes the visual definition of the lips, giving the injector an established healed lip shape and definition to work with. The sequence would be: Lip Blush → Complete healing → Lip Filler, performed by an appropriately qualified medical professional.
If you have already had lip filler, the lips should be allowed to fully settle before Lip Blush. As a general planning interval, allow approximately 4–6 weeks after filler before having Lip Blush, particularly so that swelling and any temporary changes in shape have resolved. The exact timing should be confirmed by the medical professional who performed your filler and your PMU artist.
Lip filler can temporarily change the volume, shape and symmetry of the lips due to swelling and the settling process. Lip Blush should ideally be designed around the final settled lip shape, not lips that are still swollen or changing. Waiting approximately 4–6 weeks allows the filler to settle sufficiently for the PMU artist to assess the actual shape before mapping the Lip Blush.
The current website guidance says at least 2–4 weeks, with 4 weeks preferred when treatments are close together, particularly after significant swelling or bruising. The exact interval should be confirmed by the clinician who performed the filler and the PMU artist.
The current guidance recommends that the injector see the healed Lip Blush result before deciding where and how much filler to place.
Dark or unevenly pigmented lips can have underlying tones that interfere with the colour being introduced. If a new colour is placed directly over significant underlying pigmentation, the healed result may not develop as intended because the existing pigmentation continues to influence the final colour. Neutralisation helps correct the underlying tone first.
The process is generally: Assess → Neutralise → Heal → Reassess → Introduce New Colour. First, the degree and nature of the pigmentation are assessed. A corrective colour strategy is then selected to neutralise the unwanted underlying tones rather than simply cover them. The lips are then allowed to heal and reassessed before further neutralisation or the desired colour is introduced.
There is no fixed number of sessions for every client. The number depends on the grade, depth, distribution and nature of the pigmentation, as well as how the lips respond and heal after each treatment. The lips are reassessed after healing before deciding whether another session is required.
The desired colour is introduced after the neutralisation stage has sufficiently corrected the underlying pigmentation and the lips have healed. The lips must be reassessed before moving to the colour-enhancement stage — the aim is a suitable, balanced base that allows the new colour to develop more predictably.
The purpose of neutralisation is to correct the underlying pigmentation and prepare the lips for the next stage of colour enhancement. Once healed sufficiently, the lips can be reassessed to determine whether they are ready for the desired new colour. The final healed colour will still depend on your natural lip tone, skin characteristics, pigmentation, pigment selection and individual healing response.
Not necessarily. The number of sessions depends on the grade and nature of the pigmentation and how your lips respond to the corrective treatment. For some clients, one session may be sufficient; for others, additional neutralisation may be required. The next step is always decided after the lips have healed and been reassessed.
The goal is balance and harmony, not to make every part of the lips artificially identical. Natural variation in lip colour may remain. The purpose of neutralisation is to reduce the unwanted pigmentation and create a more balanced base from which the desired colour can subsequently be developed.
Tell the studio if you have an active eye infection, significant irritation or inflammation around the eyes, recent eye surgery, certain eye conditions, previous permanent eyeliner, significant scarring in the treatment area, relevant sensitivities or allergies, or certain medications or medical conditions. If unsure, speak with your healthcare professional before proceeding.
Not necessarily. The treatment can range from an extremely subtle lash enhancement to a more visible classic or softly shaded eyeliner look. The style is customised to your eye shape and desired finish.
Your preferences are part of the consultation, but the final design should also account for your eye shape, natural lash line and the desired healed result.
Pain levels are generally minimal and manageable. A topical numbing cream is applied for approximately 15–20 minutes after the mapping and shape have been agreed upon, where appropriate for the treatment. Comfort levels vary from person to person, but our aim is to make the procedure as comfortable as possible.
The procedure is performed using the selected PMU technique with controlled pigment implantation. Rather than aggressively implanting pigment in one pass, the colour and definition are built gradually over approximately 3–4 passes, depending on the treatment and the individual, allowing the artist to work progressively towards the desired result while assessing how the skin is responding.
They can appear stronger, darker or more intense immediately after treatment. This does not represent the final healed colour. As the skin heals, the pigment settles and the appearance gradually softens.
PMU can go through several visual stages while healing. The treated area may initially look stronger, then soften, lighten and change in appearance as the skin heals. Temporary unevenness can also occur during different stages of healing. Fresh is not finished — the healed result is what matters.
Healing varies depending on the treatment, individual skin response and the area treated. The visible appearance can change throughout the healing process, which is why clients should follow their personalised aftercare instructions and allow the skin adequate time to settle before evaluating the result.
PMU involves implanting pigment into the skin, so it should not be thought of like ordinary makeup that simply washes away. However, PMU softens and fades over time. The longevity depends on factors including skin type, technique, pigment, placement, skincare, sun exposure and aftercare. Maintenance or colour-refresh appointments may therefore be required over time.
Longevity varies depending on the treatment and the individual. Factors that can influence retention include skin type, skin characteristics, technique used, pigment selection, placement, skincare routine, sun exposure, aftercare, and individual healing and pigment retention. As PMU fades, a colour refresh can be considered to restore the desired intensity and freshness.
Possibly, but suitability depends on your individual skin characteristics and the technique being considered. Your skin should be assessed before treatment so the most appropriate technique and expected finish can be discussed with you.
Possibly, but existing PMU must be assessed first. Old pigment can significantly affect the colour, shape and healed result of a new treatment. If the previous pigment has changed to a grey, blue-grey, ashy, reddish or otherwise unwanted tone, neutralisation or colour correction may be required before introducing a new colour. In cases where the old pigment is too dark, heavily saturated, too deeply implanted or significantly outside the desired shape, lightening or removal may be more appropriate.
FAYVE recommends postponing PMU during pregnancy and breastfeeding. If you are pregnant, breastfeeding or planning pregnancy, please discuss your individual circumstances with your healthcare professional before considering treatment.
Certain medications, skin conditions, allergies, previous procedures and other individual factors may affect whether PMU is appropriate. Always disclose relevant medical information, medications and previous PMU during your consultation. If there is any uncertainty regarding your suitability, medical advice should be obtained before treatment.
You will receive specific aftercare instructions based on the procedure you have undergone. Following your aftercare carefully is important because the healing process can influence pigment retention and the final healed appearance. Avoid picking, scratching or prematurely removing any flaking or scabbing, and allow the treated area to heal naturally according to the instructions provided by your artist.
Because fresh PMU is not the final result. Immediately after treatment, pigment can appear stronger and the skin can show temporary redness or sensitivity. As healing progresses, the colour softens and settles. That is why at FAYVE, we believe clients should see the complete journey: Before → Fresh → Healed. A beautiful fresh result is only the beginning. The healed result is the real result.
Not sure which treatment is right for you? Don’t worry — you don’t have to figure it out on your own. For any FAYVE procedure, simply WhatsApp us a clear picture of the area you would like treated. Our team can review your requirements and provide a customised consultation and treatment recommendation online, along with the applicable personalised pricing.
Once we receive your details and photograph, we can Assess → Recommend → Customise → Quote — helping you understand which procedure may suit you best, whether a correction or neutralisation is required, the expected treatment plan and your customised price. Where a photograph alone isn’t enough to assess suitability, we’ll guide you on the next step and arrange a consultation.
Book Your Appointment